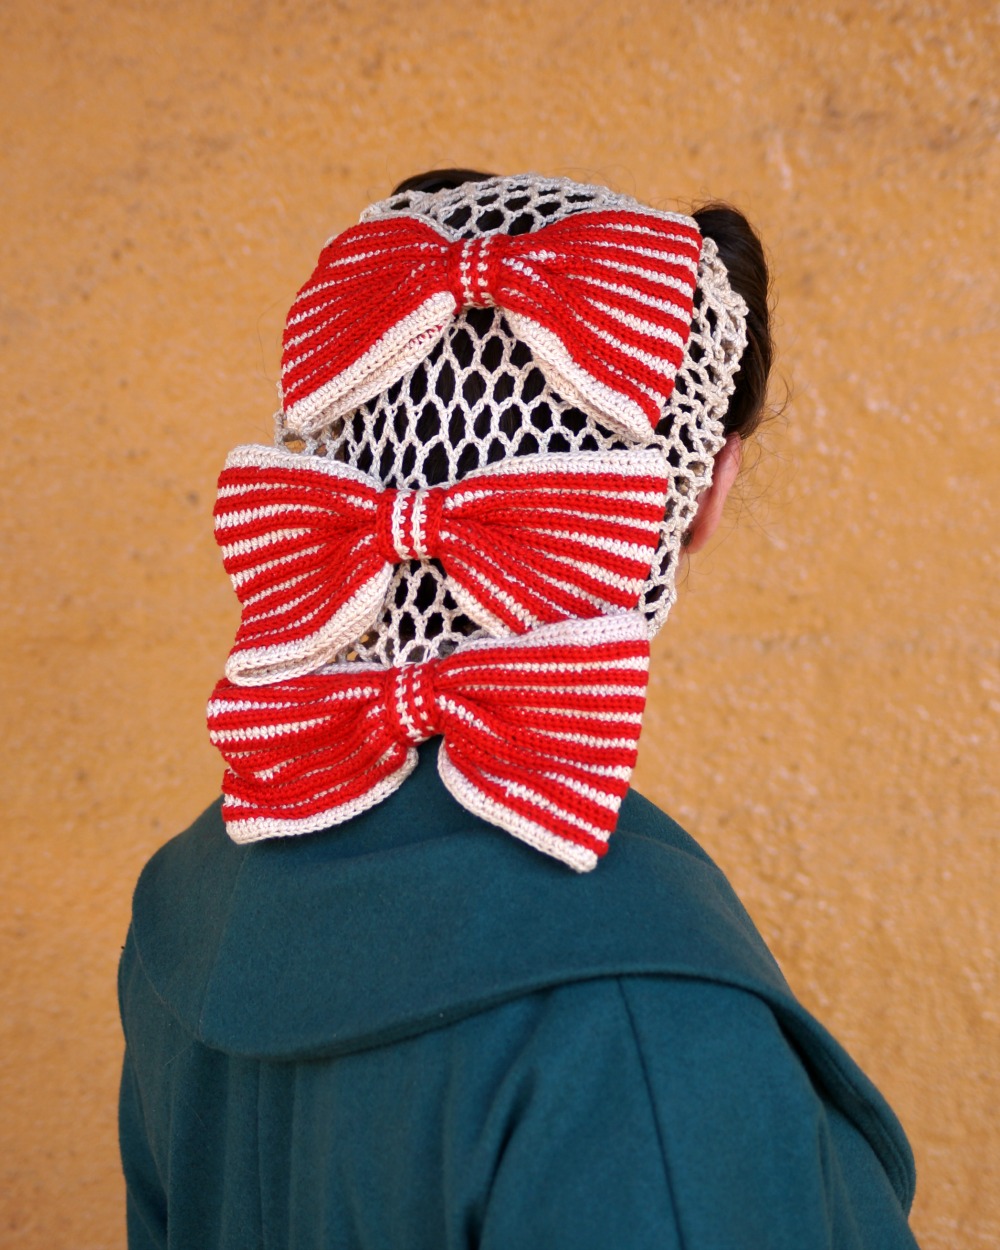
I have a special Snoodtember present for my vintage-loving crocheters: a brand new (and completely free) pattern for a vintage-inspired snood! We've called her "Cherry Stripe" (Aussie chocolate pun intended).
I was actually inspired by a vintage image of a pretty plaited hair style with three giant striped bows in it, which I thought would translate beautifully into a snood decoration.
As you may know, I'm not a crocheter myself, let alone a crochet designer, so to make this vision a reality I needed a partner with serious crochet mojo. Luckily, I have one in my sister Rhiannon (of Parlour Duck Crafts). She has surpassed my expectations with this design, and written up a detailed pattern so that you can make your own!
Feeling inspired? You can download the pattern now (and it's free!) and get started!
I'm really proud that Rhiannon and I have been able to create a completely new snood pattern to share with you and we would love to see your creations!
Thursday, 13 September 2018
Wednesday, 15 August 2018
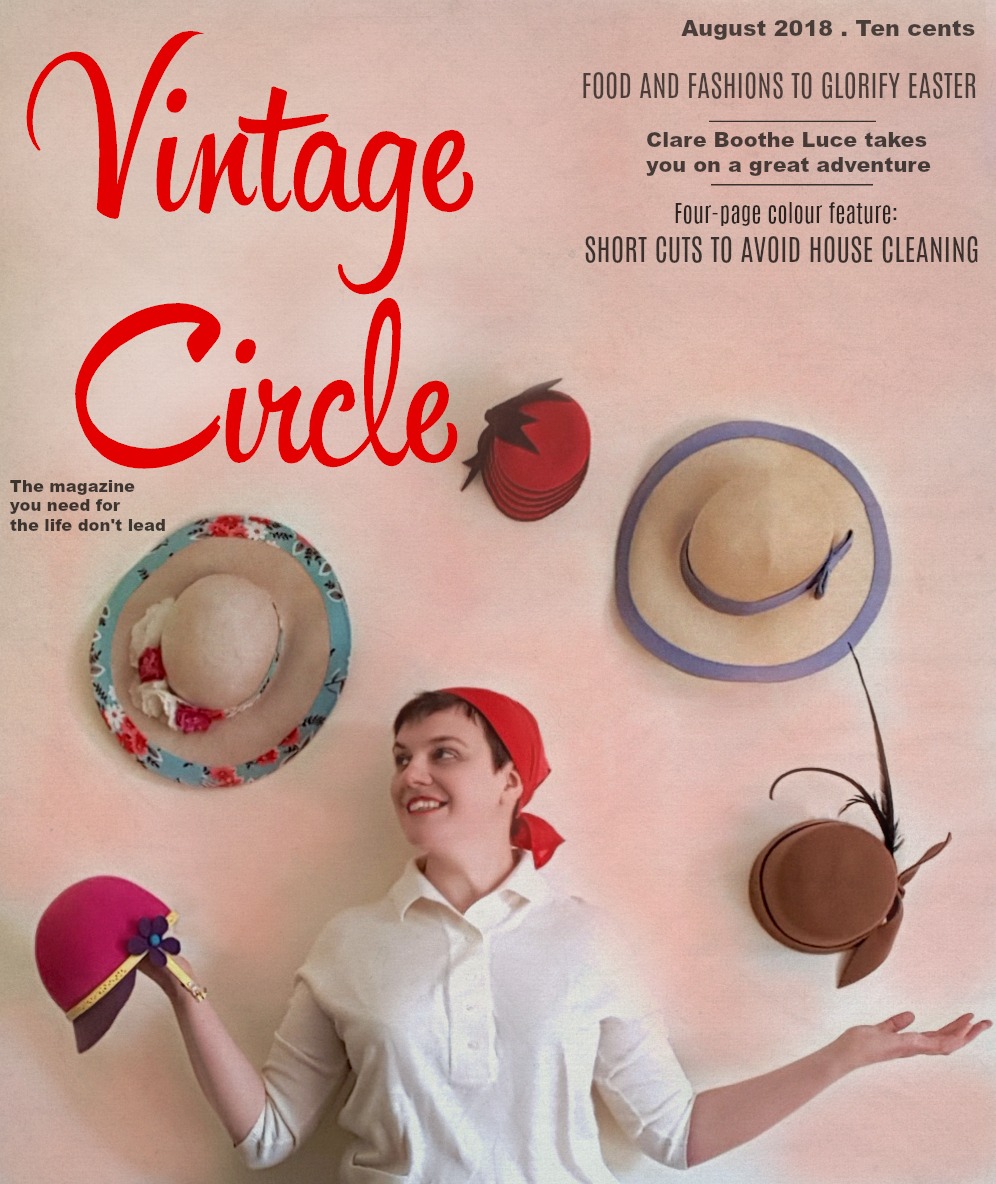
A Family Circle Cover Recreation
Last year, when I found this Family Circle cover from 1958, I knew I wanted to recreate it. It just felt really me. Not just the hats, but the cheerful feeling of it too, drew me in. I ran out of time last year, but this year I got it done!
I wish I had more hats to choose from to match the originals more closely but you work with what you have.
There have been so many great covers created already this month and shared on Instagram. Everyone is doing amazing work and it's so much fun! I look forward to seeing more.
I wish I had more hats to choose from to match the originals more closely but you work with what you have.
There have been so many great covers created already this month and shared on Instagram. Everyone is doing amazing work and it's so much fun! I look forward to seeing more.
Tuesday, 24 July 2018
"My Vintage Cover" is back!
I hope you're in the mood for some vintage image recreations, because "My Vintage Cover" is coming back this August!
Like last year, Nicole of The Artyologist and I are hosting this community challenge and inviting you all to join us in recreating iconic vintage fashion images.
If you want to join in, here's what you need to know:
I hope you'll join us - and if not, I hope you'll enjoy watching along!
Like last year, Nicole of The Artyologist and I are hosting this community challenge and inviting you all to join us in recreating iconic vintage fashion images.
If you want to join in, here's what you need to know:
- The challenge runs from August 1-31 and you can share your images at any time during the month
- This is a non-competitive community event, just join in and have fun!
- Take part on Instagram or on your own blog (if you have one). If you post on Instagram, use the hashtag #myvintagecover, and feel free to tag Nicole @theartyologist or me @tanithrowan as well. If you post on your blog, let us know so we don't miss it and can include you in a round-up post at the end.
- Although it is called "My Vintage Cover", feel free to choose any vintage fashion image to recreate.
- When you share your image, share the inspiration image too (or link to it) so that we can see the original too.
- Don't be daunted by feeling that you have to do a detailed and faithful recreation, you can be as accurate as you want or just recreate some elements of the image.
- Create as many images as you want to!
- Feel free to repost the above image to share the news of the challenge around.
I hope you'll join us - and if not, I hope you'll enjoy watching along!
Thursday, 17 May 2018
7 Hat Projects for Recycling Clothes and Using up Scraps
Most hats require smaller quantities of fabric than garments, so they are a great way to use up scrap fabric or refashion garments. After reading Nicole's excellent post on 12 Ways to Recycle Used Clothing and Textiles, I decided to have a think about some specific hat projects that make great scrap-busters and refashion ideas. Here are some of my favourites.
Intended for velvet or velveteen, and beautiful in those, I have also made this in other fabrics (and intend to again). It takes a small amount of fabric and with clever layout can use multiple smaller scraps. It does require a buckram foundation and wire as well.
I've reviewed and given some tips for this original (and free) 1954 pattern.
Whether it's to go with a hat or wear by itself, a snood gives a fun 40s feel to an outfit, and if you can't crochet, you can still make one! Perfect for any fabric with a good drape, super easy to make, and only needing the fabric and a bit of elastic.
All the instructions are here from the Snoodtember Snood-a-long.
My very first beret made with the pattern that would become my Grevillea beret was made from a sleeve of my old favourite coat. Because of the sectioned layout and multiple band width options, you can really make this work out of some odd shaped scraps or old garments. It's great for coats, jackets, and nice trousers as well as project scraps, of course.
You can get the Grevillea beret pattern here.
Another one for the velvets, but I think it would have a lot of potential in other fabrics, and takes a very small amount to make. It does need wire and buckram for the foundation, but not a lot of those either. The veiling is optional and all sorts of trim could be used.
Read my thoughts on this free vintage pattern.
This one is particularly special because it's intended for regular cotton fabrics, so can use up some cute plain or printed fabrics, and only takes about a fat quarter of material. It's also a really simple pattern, quick to make, and can be decorated for further personalisation.
Another free vintage pattern, I've reviewed and given advice on this beach hat here.
Of course, making a hat from scratch is not the only option. All kinds of trims can be made from small amounts of fabric, and sometimes all a tired hat needs is a little revamp.
For this straw hat I've used leftover fabric from a garment sewing project to create the band and the brim binding, and I love the extra colour it adds. In this case the straw was new but the principle applies and it's a great way to freshen up an older and plain hat. Similarly, it's easy to add fabric bows and other special touches, with pretty small amounts of material.
While French flower making is pretty complex and requires special (and expensive) tools, there are plenty of quicker and easier ways to make flowers. Ribbon flowers have whole books written on them, and ideas for both ribbon and fabric flowers appear in vintage publications quite often (not always with good instructions though!).
There are many more great hat projects out there for recycling fabrics and using up small scraps (see the rest of the patterns in the Trove Pattern Project as a starting point) but these are some of my favourites.
Have any of these sparked your imagination? Are there any other hat projects you have tried for using fabric scraps or recycling clothes?
To keep up with hat-making tips and millinery information, sign up for the email newsletter here.
1. A 1954 Butterfly Cap
Intended for velvet or velveteen, and beautiful in those, I have also made this in other fabrics (and intend to again). It takes a small amount of fabric and with clever layout can use multiple smaller scraps. It does require a buckram foundation and wire as well.
I've reviewed and given some tips for this original (and free) 1954 pattern.
2. A 40s-style fabric snood
Whether it's to go with a hat or wear by itself, a snood gives a fun 40s feel to an outfit, and if you can't crochet, you can still make one! Perfect for any fabric with a good drape, super easy to make, and only needing the fabric and a bit of elastic.
All the instructions are here from the Snoodtember Snood-a-long.
3. A classic multi-era beret
My very first beret made with the pattern that would become my Grevillea beret was made from a sleeve of my old favourite coat. Because of the sectioned layout and multiple band width options, you can really make this work out of some odd shaped scraps or old garments. It's great for coats, jackets, and nice trousers as well as project scraps, of course.
You can get the Grevillea beret pattern here.
4. 1939 "Doll's Hat"
Another one for the velvets, but I think it would have a lot of potential in other fabrics, and takes a very small amount to make. It does need wire and buckram for the foundation, but not a lot of those either. The veiling is optional and all sorts of trim could be used.
Read my thoughts on this free vintage pattern.
5. Beach Hat
This one is particularly special because it's intended for regular cotton fabrics, so can use up some cute plain or printed fabrics, and only takes about a fat quarter of material. It's also a really simple pattern, quick to make, and can be decorated for further personalisation.
Another free vintage pattern, I've reviewed and given advice on this beach hat here.
Of course, making a hat from scratch is not the only option. All kinds of trims can be made from small amounts of fabric, and sometimes all a tired hat needs is a little revamp.
6. Retrim an old hat
For this straw hat I've used leftover fabric from a garment sewing project to create the band and the brim binding, and I love the extra colour it adds. In this case the straw was new but the principle applies and it's a great way to freshen up an older and plain hat. Similarly, it's easy to add fabric bows and other special touches, with pretty small amounts of material.
7. Fabric flowers (also ribbon flowers)
While French flower making is pretty complex and requires special (and expensive) tools, there are plenty of quicker and easier ways to make flowers. Ribbon flowers have whole books written on them, and ideas for both ribbon and fabric flowers appear in vintage publications quite often (not always with good instructions though!).
There are many more great hat projects out there for recycling fabrics and using up small scraps (see the rest of the patterns in the Trove Pattern Project as a starting point) but these are some of my favourites.
Have any of these sparked your imagination? Are there any other hat projects you have tried for using fabric scraps or recycling clothes?
To keep up with hat-making tips and millinery information, sign up for the email newsletter here.
Labels:
1930s,
1940s,
1950s,
beret,
ethical fashion,
grevillea beret,
refashion
Tuesday, 10 April 2018
Learning: Crinoline Veils
Last year's learning streak continues this year, and I am still loving my online millinery courses through Hat Academy, to keep my skills moving forward even when I don't have much free time for my craft. Although actually I started this course last year, but I've just bought a couple more and I have a gift voucher from Christmas, so it's definitely ongoing!
This is my first piece using the skills from the Veiled Crowns Deluxe Course, taught by Rebecca Share. The trim is taught in the Leather Flower Crowns course, which I took even though I don't use leather, because I love the style of the halo crowns, which you saw combined with lace millinery in my lace garden collection. And the techniques are proving useful in other ways and with other materials, so I'm really glad of it.
I had hardly even handled crinoline before taking this course, and I loved learning so much about the material. Even though I hadn't yet finished this piece, I used the confidence with crinoline to make a custom hat for Melbourne Cup last year.
The second half of the course is making crinoline spirals, and I think I like that look best, but I'm still working on blinging that piece to the moon and back before you get to see it!
I am looking forward to trying out some of the leather techniques on some alternative vegan leathers, but in the meantime, I tried this technique on a scrap of fake snakeskin that I had been keeping for approximately a million years. I like the texture it brings and I'm happy to have finally used it.
Although there's still more left.
It's far from perfect, and if you've been following along on Instagram you would have seen that this took a few goes to get just right, and it spent a long time sitting on a mannequin before I decided what to do, but it's been a great learning experience. I look forward to sharing more of them with you!
So what do you think of this alternative take on the face veil?
To keep up with my millinery journey and latest makes, sign up for the email newsletter here.
This is my first piece using the skills from the Veiled Crowns Deluxe Course, taught by Rebecca Share. The trim is taught in the Leather Flower Crowns course, which I took even though I don't use leather, because I love the style of the halo crowns, which you saw combined with lace millinery in my lace garden collection. And the techniques are proving useful in other ways and with other materials, so I'm really glad of it.
I had hardly even handled crinoline before taking this course, and I loved learning so much about the material. Even though I hadn't yet finished this piece, I used the confidence with crinoline to make a custom hat for Melbourne Cup last year.
The second half of the course is making crinoline spirals, and I think I like that look best, but I'm still working on blinging that piece to the moon and back before you get to see it!
I am looking forward to trying out some of the leather techniques on some alternative vegan leathers, but in the meantime, I tried this technique on a scrap of fake snakeskin that I had been keeping for approximately a million years. I like the texture it brings and I'm happy to have finally used it.
Although there's still more left.
It's far from perfect, and if you've been following along on Instagram you would have seen that this took a few goes to get just right, and it spent a long time sitting on a mannequin before I decided what to do, but it's been a great learning experience. I look forward to sharing more of them with you!
So what do you think of this alternative take on the face veil?
To keep up with my millinery journey and latest makes, sign up for the email newsletter here.
Thursday, 1 March 2018
Tutorial: Adding felt appliqué birds to your Grevillea Beret
Today I'm sharing the pattern and instructions for adding some birds to your Grevillea Beret using felt. As you know, I love felt, I love berets, and I love birds on hats, (I really love birds on hats.) so it's about time to combine all three!
Thin felt (1mm thickness is good, and I prefer 100% wool)
Embroidery floss to match your felt
Appliqué birds pattern, printed out
*Look obviously you could use a different pattern or appliqué onto a beret you already own, but let's not dwell on that idea too long.
Note: the birds have very narrow sections on the tails that pull apart easily. Handle the pieces very carefully. You may even want to consider cutting them wider at first and trimming just before you sew.
Put your beret crown on a mannequin (or your own head, but that's a bit trickier), folding under the seam allowance. Pin your felt shapes in place and rearrange them until you are happy with the layout.
Sew your felt shapes in place one by one using two strands of embroidery floss. I used a whipstitch, following this video tutorial by Wendi Gratz. Others suggested blanket stitch, so I would recommend looking at both and deciding which you prefer. I liked the simple option and it seems to have worked well.
Note: that advice above about the tails? I was not so good at following it myself. I lost two tail ends, so as I stitched the pieces on I had to do a little bit of extra embroidery to replace them. It looks OK from a distance and it's a good way to recover the situation, but I'd recommend trying to avoid the problem instead!
Once your birds are on, proceed to add the lining and the headband and finish off your beret.
My husband wasn't sure about the black and white, and I think in hindsight I agree, but it does make for good contrast images. I'd like maybe navy with pale grey birds. What colours can you see it in?
You will need:
Your Grevillea Beret pattern and all the usual material and tool requirements for it*Thin felt (1mm thickness is good, and I prefer 100% wool)
Embroidery floss to match your felt
Appliqué birds pattern, printed out
*Look obviously you could use a different pattern or appliqué onto a beret you already own, but let's not dwell on that idea too long.
Cutting out your birds:
I printed my pattern on to regular paper, cut the pattern pieces out, traced around them with an air-disappearing pen and cut the pieces from the felt. I found this to be OK, but it did require some trimming afterwards to smooth out some bits. I think a better method would be using freezer paper, although I know it's not as easy to find in Australia.Note: the birds have very narrow sections on the tails that pull apart easily. Handle the pieces very carefully. You may even want to consider cutting them wider at first and trimming just before you sew.
Sewing the birds on:
As you are working through construction of your beret, you want to add the appliqué at the point where your crown is complete, but before you add lining (if you aren't adding a lining you could add an appliqué at any point).Put your beret crown on a mannequin (or your own head, but that's a bit trickier), folding under the seam allowance. Pin your felt shapes in place and rearrange them until you are happy with the layout.
Sew your felt shapes in place one by one using two strands of embroidery floss. I used a whipstitch, following this video tutorial by Wendi Gratz. Others suggested blanket stitch, so I would recommend looking at both and deciding which you prefer. I liked the simple option and it seems to have worked well.
Note: that advice above about the tails? I was not so good at following it myself. I lost two tail ends, so as I stitched the pieces on I had to do a little bit of extra embroidery to replace them. It looks OK from a distance and it's a good way to recover the situation, but I'd recommend trying to avoid the problem instead!
Once your birds are on, proceed to add the lining and the headband and finish off your beret.
My husband wasn't sure about the black and white, and I think in hindsight I agree, but it does make for good contrast images. I'd like maybe navy with pale grey birds. What colours can you see it in?
Tuesday, 28 November 2017
Sisterhood of the Travelling Hat: Tanith
Three years ago I had a newborn baby and I made a felt hat that would travel the world.
It was a journey that I expected to take a year, that ended up taking three, when it should have taken two. It's been a year since Adelaide, as we named the hat, came home to me, hand delivered by my sister, who was the last person she visited.
At that time I was pregnant, exhausted, not fitting into most of my clothes, and not really feeling like being the subject of photos. I did plan to do it anyway, many times, but I made more and more excuses. Time. Energy. Wardrobe. Body Image. Hair. Heat. Rain. Then T-Rex was born and naturally it became even more difficult to get a photo shoot done, and life was even more exhausting. Plus, after all the wait, I felt I should make it a really good shoot. A really good outfit. A special location.
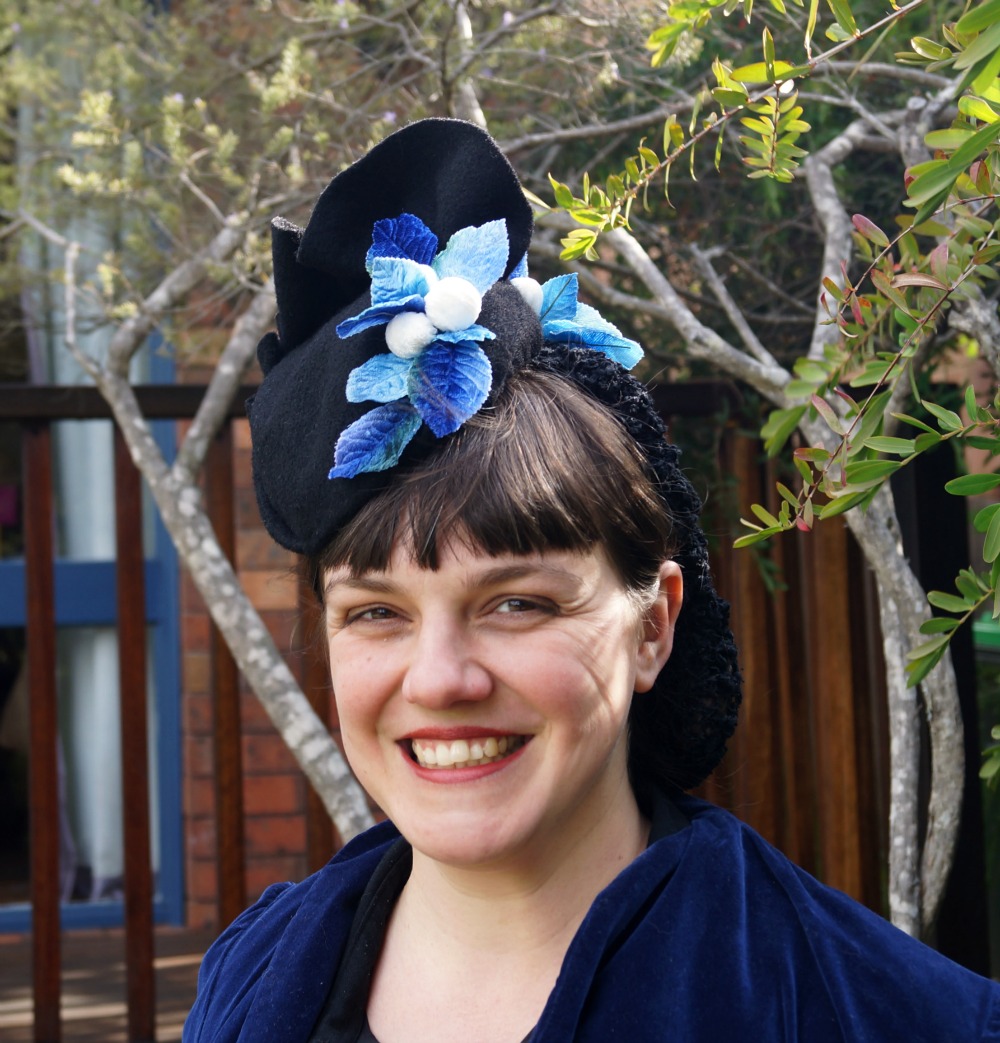
In the end, it wasn't any of those things. But enough was enough! While T-Rex napped, we went outside and my husband took photos of me in front of our deck and a bush in our neighbour's front yard while Teacup played and picked flowers.
And it was enough. Of course it was. I should have known.
Because I have no hairstyling skills, I decided to try the hat with a snood, and I really like how they look together. I threw my Evelyn Wood velvet coat/dress over a black shirt dress and there you have it.
Adelaide came home with many souvenirs, including her decorated hat box. I wasn't sure what I was going to do with her after she came home, but I think I'll have to pack her back up with her treasures and keep her for the future, for my daughter perhaps.
I love how Adelaide's journey is one of so many stories. 8 countries, 18 different women. Some of the bloggers who participated are no longer blogging, no longer present in the vintage community. Some have become close online friends, some I have since met in person as well. And the newborn baby who napped while I blocked this felt is now a chatty three-year old, with a baby brother.
Thank you all so much.
It was a journey that I expected to take a year, that ended up taking three, when it should have taken two. It's been a year since Adelaide, as we named the hat, came home to me, hand delivered by my sister, who was the last person she visited.
At that time I was pregnant, exhausted, not fitting into most of my clothes, and not really feeling like being the subject of photos. I did plan to do it anyway, many times, but I made more and more excuses. Time. Energy. Wardrobe. Body Image. Hair. Heat. Rain. Then T-Rex was born and naturally it became even more difficult to get a photo shoot done, and life was even more exhausting. Plus, after all the wait, I felt I should make it a really good shoot. A really good outfit. A special location.
In the end, it wasn't any of those things. But enough was enough! While T-Rex napped, we went outside and my husband took photos of me in front of our deck and a bush in our neighbour's front yard while Teacup played and picked flowers.
And it was enough. Of course it was. I should have known.
Because I have no hairstyling skills, I decided to try the hat with a snood, and I really like how they look together. I threw my Evelyn Wood velvet coat/dress over a black shirt dress and there you have it.
Adelaide came home with many souvenirs, including her decorated hat box. I wasn't sure what I was going to do with her after she came home, but I think I'll have to pack her back up with her treasures and keep her for the future, for my daughter perhaps.
I love how Adelaide's journey is one of so many stories. 8 countries, 18 different women. Some of the bloggers who participated are no longer blogging, no longer present in the vintage community. Some have become close online friends, some I have since met in person as well. And the newborn baby who napped while I blocked this felt is now a chatty three-year old, with a baby brother.
Thank you all so much.
Thursday, 23 November 2017
Say hello to the Grevillea beret pattern!
More than a year in the making, my first hat sewing pattern is here, and I'm delighted to finally share the Grevillea Beret with you. Choosing what the first pattern should be wasn't easy, but when I think of how many berets I've made for myself from this pattern, and how often I wear them when the cool weather rolls around (which is most of the year, to be honest), it was the obvious choice.
So, here are the basics about the hat. It's a sectioned crown beret, with two views, one with six sections and one with eight, and two widths of side head band.
It's great for lovely wools. I like to use old jackets and coats sometimes, and in fact my first beret from this pattern was once a much loved red coat.
You can wear the beret in a variety of ways; it's really versatile. I'm a fan of wearing mine to the back of the head as shown in most of the images. And I really do wear them. I have three in my wardrobe and I'm making a fourth at the moment, and they are my go-to cool weather hat.
The basics about the pattern. It's available at my Etsy shop as a downloadable PDF pattern. You get two PDF files, one is the instructions and one is the pattern. The instructions contain all you need to know about fabrics, sizes, whether to line it, what to do about grain direction, and of course full step-by-step instructions with photos.
The pattern file will need to be printed out, at 100% size, and the pieces cut and assembled (where they are larger than one page). The instructions include explaining how to do that if you are new to print-at-home patterns.
I'm really excited (and tired and beyond-anything-terrified but let's stay positive) to be launching this pattern into the world and starting out in this new direction. Expect some tips and tricks and bonus tutorials coming up soon!
I do have things in motion for the next few patterns but feel free to suggest what you'd like to see in the future.
(Oh and one more time, you can get the pattern here.)
So, here are the basics about the hat. It's a sectioned crown beret, with two views, one with six sections and one with eight, and two widths of side head band.
It's great for lovely wools. I like to use old jackets and coats sometimes, and in fact my first beret from this pattern was once a much loved red coat.
You can wear the beret in a variety of ways; it's really versatile. I'm a fan of wearing mine to the back of the head as shown in most of the images. And I really do wear them. I have three in my wardrobe and I'm making a fourth at the moment, and they are my go-to cool weather hat.
The basics about the pattern. It's available at my Etsy shop as a downloadable PDF pattern. You get two PDF files, one is the instructions and one is the pattern. The instructions contain all you need to know about fabrics, sizes, whether to line it, what to do about grain direction, and of course full step-by-step instructions with photos.
The pattern file will need to be printed out, at 100% size, and the pieces cut and assembled (where they are larger than one page). The instructions include explaining how to do that if you are new to print-at-home patterns.
I'm really excited (and tired and beyond-anything-terrified but let's stay positive) to be launching this pattern into the world and starting out in this new direction. Expect some tips and tricks and bonus tutorials coming up soon!
I do have things in motion for the next few patterns but feel free to suggest what you'd like to see in the future.
(Oh and one more time, you can get the pattern here.)
Thursday, 16 November 2017
Flowers, crinoline, and a place for millinery
This latest custom creation combines two more new skills (I said I wanted to learn this year, and I'm really doing it!) but I'll have to talk more about each of them another time.
I actually took another online class on working with crinoline, and I have 1.5 finished hats using those techniques, but no photos of the completed one yet. Still, it gave me a lot of confidence with the material, and I used the techniques in a slightly different way to bring this hat to life.
I feel like it's a real mix of vintage shape and details but using a less conventional material and realising the project using modern techniques. Definitely an unusual one for me, but I'm really pleased with it!
One thing that usually happens when I'm working on custom orders is that I'll get excited and ambitious, and this happened rather a lot here. I sketched flowers in the original design and figured I'd work out the details later. In the end, "the details" became me tackling yet another new skill - French flower making.
Traditional flower making involves heated tools applied to stiffened fabric (usually silk), and it seemed a bit daunting, but I managed to achieved some creditable results in my self-imposed crash course. The usual beginner flowers are roses, but yet again ambition got the better of me, and I veered off on my own to try pansies. In the end I think they are much easier as the petals are relatively flat and they only have 5 petals each, so I saved myself some time there!
It's not an ideal technique for working in tiny pockets of time in the evenings though, so my progress from here may be rather slow, but I know I'll get to it at some point.
This is the first hat of mine to attend the Melbourne Cup (as far as I know). I had mixed feelings about this and had a little reflect on my ethics. I love hats, and in Australia racing fashion is the primary millinery market and the pinnacle of the art is displayed at Melbourne Cup. Milliners involved in this field are pushing the boundaries all the time and creating techniques and styles that are beyond stunning and incredibly intricate. It is the most inspiring stuff.
Racing, on the other hand, stands for a whole lot that I am not keen on, but primarily the mistreatment of animals. (I'm not crash hot on gambling and binge-drinking either). It's mainly for this reason that I've not chased the racing fashion clients, and I'm glad that I chose not too. I've ended up much happier in my lovely vintage fashion niche anyway.
I don't really have a point there, just to say that as much as I am loving learning the newer techniques and making things in different styles, that I won't be changing direction into racing fashion, even though the average person in Australia assumes that it is all any milliners do.
And that I wish there could be some other event that gave every day people a socially-acceptable reason to wear extreme, high-fashion art millinery. That would be cool.
P.S. Thanks to Beccie for letting me use her photos in the post. All I had were the other ones with pins still in the hat!
I actually took another online class on working with crinoline, and I have 1.5 finished hats using those techniques, but no photos of the completed one yet. Still, it gave me a lot of confidence with the material, and I used the techniques in a slightly different way to bring this hat to life.
I feel like it's a real mix of vintage shape and details but using a less conventional material and realising the project using modern techniques. Definitely an unusual one for me, but I'm really pleased with it!
One thing that usually happens when I'm working on custom orders is that I'll get excited and ambitious, and this happened rather a lot here. I sketched flowers in the original design and figured I'd work out the details later. In the end, "the details" became me tackling yet another new skill - French flower making.
Traditional flower making involves heated tools applied to stiffened fabric (usually silk), and it seemed a bit daunting, but I managed to achieved some creditable results in my self-imposed crash course. The usual beginner flowers are roses, but yet again ambition got the better of me, and I veered off on my own to try pansies. In the end I think they are much easier as the petals are relatively flat and they only have 5 petals each, so I saved myself some time there!
It's not an ideal technique for working in tiny pockets of time in the evenings though, so my progress from here may be rather slow, but I know I'll get to it at some point.
This is the first hat of mine to attend the Melbourne Cup (as far as I know). I had mixed feelings about this and had a little reflect on my ethics. I love hats, and in Australia racing fashion is the primary millinery market and the pinnacle of the art is displayed at Melbourne Cup. Milliners involved in this field are pushing the boundaries all the time and creating techniques and styles that are beyond stunning and incredibly intricate. It is the most inspiring stuff.
Racing, on the other hand, stands for a whole lot that I am not keen on, but primarily the mistreatment of animals. (I'm not crash hot on gambling and binge-drinking either). It's mainly for this reason that I've not chased the racing fashion clients, and I'm glad that I chose not too. I've ended up much happier in my lovely vintage fashion niche anyway.
I don't really have a point there, just to say that as much as I am loving learning the newer techniques and making things in different styles, that I won't be changing direction into racing fashion, even though the average person in Australia assumes that it is all any milliners do.
And that I wish there could be some other event that gave every day people a socially-acceptable reason to wear extreme, high-fashion art millinery. That would be cool.
P.S. Thanks to Beccie for letting me use her photos in the post. All I had were the other ones with pins still in the hat!
Wednesday, 8 November 2017
"Lace Garden" mini collection
As you may or may not know, as well as selling through Etsy, I have my hats in a local bricks-and-mortar shop, called The Blackheath Hub, which stocks the work of over 100 artisans from the Blue Mountains. They've recently started doing themed exhibitions as well. I wouldn't have thought I would have time to contribute, but when I heard the theme was flowers, and I had just finished the my first lace flower headpiece and the lace halo crown, and was starting a few more pieces, I thought I might actually be able to do it!
And I did! There were a few late nights at the end, but I completed the remaining three pieces I hoped to make.
Two were smaller simpler pieces (although with four flowers each that's still 20 wired lace pieces and at least 5 hours work!) that I felt would help round out the collection. (If anyone's keeping a list of "things that are hard to photograph", you can go ahead and add black lace and white lace to it.)
The fifth was a bit more of a...statement piece. I sketched this in hospital, or perhaps shortly afterwards in my long periods of lying around and drinking coke on doctor's orders, and I've been excited for it ever since.
I had long periods of doubt during the making process, particularly when I was making the bird, asked my husband how he thought it looked so far, and he replied "What's it supposed to be?" In the end though, I'm pleased with the result.
Having heard the next couple of planned themes, I'm keen to participate in more of the Hub's exhibitions. I love a good theme, and although I don't love a deadline, they do help me get things done. I doubt that the gold and black one would actually have gotten done this year, if at all, otherwise, and I'm really proud of it, so the odd deadline must be good for me.
Which do you prefer: over-the-top statement piece or delicate (relatively) subtle crown?
And I did! There were a few late nights at the end, but I completed the remaining three pieces I hoped to make.
Two were smaller simpler pieces (although with four flowers each that's still 20 wired lace pieces and at least 5 hours work!) that I felt would help round out the collection. (If anyone's keeping a list of "things that are hard to photograph", you can go ahead and add black lace and white lace to it.)
The fifth was a bit more of a...statement piece. I sketched this in hospital, or perhaps shortly afterwards in my long periods of lying around and drinking coke on doctor's orders, and I've been excited for it ever since.
I had long periods of doubt during the making process, particularly when I was making the bird, asked my husband how he thought it looked so far, and he replied "What's it supposed to be?" In the end though, I'm pleased with the result.
Having heard the next couple of planned themes, I'm keen to participate in more of the Hub's exhibitions. I love a good theme, and although I don't love a deadline, they do help me get things done. I doubt that the gold and black one would actually have gotten done this year, if at all, otherwise, and I'm really proud of it, so the odd deadline must be good for me.
Which do you prefer: over-the-top statement piece or delicate (relatively) subtle crown?
Tuesday, 17 October 2017
The Trove Pattern Project - Reviewing Free Vintage Hat Patterns
It's been more than three years since I attempted the first vintage millinery pattern that I found in the pages of the Australian Women's Weekly, and two years since I started my official attempt to test and review all of the free hat patterns I could find in the Trove archive. In that time, I've tried 8 sewing patterns and my sister and I have also reviewed a crochet snood pattern, ranging from the 1920s to the 1950s. That seems a little weak, but I've also made two humans so, you know, back off.
Anyway I decided that it was time to create a page to bring all that information together into one place, and also share the links to some of the future projects waiting in the wings (there are many many patterns I've found, so I'll add to this more as I go). So here it goes, the master list!
1954 "Butterfly Cap", a velvet bow on a wired buckram foundation, from the Australian Women's Weekly.
1954 Scarf Hat, a simple fabric hat, from the Australian Women's Weekly
1949 Pixie Hat, felt or velvet pixie style hat with a pointed crown and turned up brim, from the Australian Women's Weekly.
1953 Scarf Hat, a draped jersey scarf with a padded headband, from the Australian Women's Weekly.
1939 Doll's Hat, a tilted cone-shaped hat on a buckram foundation, from Table Talk.
1934 "Vagabond Beret", an asymmetrical fabric beret, from the Sydney Morning Herald.
1930 "Smart Little Turban", a simple tied turban, from the Brisbane Courier.
1954 Beach Hat, a simple fabric hat that opens flat and does up with a button, from the Australian Women's Weekly.
1942 Bow Snood, a crocheted snood with bow, from the Australian Women's Weekly.
1922 "Easy to make turban", silk or satin turban on a stiff foundation, from the Sydney Mail.
1930 Bandeau Hat, a felt and ribbon hat, from the Western Mail
1913 "A new hat for 1913", four corner hat, from The Sunday Times.
1961 "Six-rose hat", from the Australian Women's Weekly
1934 Five hats from one pattern, from The Home Maker.
1951 "Bed of Violets", from the Australian Women's Weekly.
1950 "Quaker Bonnet", from the Australian Women's Weekly.
1952 Ribbon pixie hat, from the Australian Women's Weekly.
1954 Velvet beret, from the Australian Women's Weekly.
1933 "A Smart hat for sport", from the Sydney Morning Herald.
1912 "Pierrot Hat", from the Brisbane Courier.
1960 Fur hat, from The Australian Women's Weekly.
1915 Velvet Hat, from the Leader.
I'm keen to hear which of those patterns you would be most excited to see me try next. And if you make (or have previously made) any of these, I'd love to hear from you too and would be happy add a link to your creations.
If you are interested in making hats, make sure you are signed up to the newsletter to keep up with future reviews and also the upcoming launch of my own first hat sewing pattern!
Anyway I decided that it was time to create a page to bring all that information together into one place, and also share the links to some of the future projects waiting in the wings (there are many many patterns I've found, so I'll add to this more as I go). So here it goes, the master list!
Reviewed Patterns
NB: Links here will take you to my review, and the link to the original articles will be in those posts.1954 "Butterfly Cap", a velvet bow on a wired buckram foundation, from the Australian Women's Weekly.
1954 Scarf Hat, a simple fabric hat, from the Australian Women's Weekly
1949 Pixie Hat, felt or velvet pixie style hat with a pointed crown and turned up brim, from the Australian Women's Weekly.
1953 Scarf Hat, a draped jersey scarf with a padded headband, from the Australian Women's Weekly.
1939 Doll's Hat, a tilted cone-shaped hat on a buckram foundation, from Table Talk.
1934 "Vagabond Beret", an asymmetrical fabric beret, from the Sydney Morning Herald.
1930 "Smart Little Turban", a simple tied turban, from the Brisbane Courier.
1954 Beach Hat, a simple fabric hat that opens flat and does up with a button, from the Australian Women's Weekly.
1942 Bow Snood, a crocheted snood with bow, from the Australian Women's Weekly.
Future Projects
NB: Links here will take you to the original article and pattern/instructions.1922 "Easy to make turban", silk or satin turban on a stiff foundation, from the Sydney Mail.
1930 Bandeau Hat, a felt and ribbon hat, from the Western Mail
1913 "A new hat for 1913", four corner hat, from The Sunday Times.
1961 "Six-rose hat", from the Australian Women's Weekly
1934 Five hats from one pattern, from The Home Maker.
1951 "Bed of Violets", from the Australian Women's Weekly.
1950 "Quaker Bonnet", from the Australian Women's Weekly.
1952 Ribbon pixie hat, from the Australian Women's Weekly.
1954 Velvet beret, from the Australian Women's Weekly.
1933 "A Smart hat for sport", from the Sydney Morning Herald.
1912 "Pierrot Hat", from the Brisbane Courier.
1960 Fur hat, from The Australian Women's Weekly.
1915 Velvet Hat, from the Leader.
I'm keen to hear which of those patterns you would be most excited to see me try next. And if you make (or have previously made) any of these, I'd love to hear from you too and would be happy add a link to your creations.
If you are interested in making hats, make sure you are signed up to the newsletter to keep up with future reviews and also the upcoming launch of my own first hat sewing pattern!
Subscribe to:
Posts (Atom)
©
Tanith Rowan | All rights reserved.