Thursday, 17 May 2018

7 Hat Projects for Recycling Clothes and Using up Scraps

Most hats require smaller quantities of fabric than garments, so they are a great way to use up scrap fabric or refashion garments. After reading Nicole's excellent post on 12 Ways to Recycle Used Clothing and Textiles, I decided to have a think about some specific hat projects that make great scrap-busters and refashion ideas. Here are some of my favourites.

1. A 1954 Butterfly Cap


Intended for velvet or velveteen, and beautiful in those, I have also made this in other fabrics (and intend to again). It takes a small amount of fabric and with clever layout can use multiple smaller scraps. It does require a buckram foundation and wire as well.

I've reviewed and given some tips for this original (and free) 1954 pattern.

2. A 40s-style fabric snood


Whether it's to go with a hat or wear by itself, a snood gives a fun 40s feel to an outfit, and if you can't crochet, you can still make one! Perfect for any fabric with a good drape, super easy to make, and only needing the fabric and a bit of elastic.

All the instructions are here from the Snoodtember Snood-a-long.

3. A classic multi-era beret


My very first beret made with the pattern that would become my Grevillea beret was made from a sleeve of my old favourite coat. Because of the sectioned layout and multiple band width options, you can really make this work out of some odd shaped scraps or old garments. It's great for coats, jackets, and nice trousers as well as project scraps, of course.

You can get the Grevillea beret pattern here.

4. 1939 "Doll's Hat"


Another one for the velvets, but I think it would have a lot of potential in other fabrics, and takes a very small amount to make. It does need wire and buckram for the foundation, but not a lot of those either. The veiling is optional and all sorts of trim could be used.

Read my thoughts on this free vintage pattern.

5. Beach Hat


This one is particularly special because it's intended for regular cotton fabrics, so can use up some cute plain or printed fabrics, and only takes about a fat quarter of material. It's also a really simple pattern, quick to make, and can be decorated for further personalisation.

Another free vintage pattern, I've reviewed and given advice on this beach hat here.

Of course, making a hat from scratch is not the only option. All kinds of trims can be made from small amounts of fabric, and sometimes all a tired hat needs is a little revamp.

6. Retrim an old hat


For this straw hat I've used leftover fabric from a garment sewing project to create the band and the brim binding, and I love the extra colour it adds. In this case the straw was new but the principle applies and it's a great way to freshen up an older and plain hat. Similarly, it's easy to add fabric bows and other special touches, with pretty small amounts of material.

7. Fabric flowers (also ribbon flowers)


While French flower making is pretty complex and requires special (and expensive) tools, there are plenty of quicker and easier ways to make flowers. Ribbon flowers have whole books written on them, and ideas for both ribbon and fabric flowers appear in vintage publications quite often (not always with good instructions though!).

There are many more great hat projects out there for recycling fabrics and using up small scraps (see the rest of the patterns in the Trove Pattern Project as a starting point) but these are some of my favourites.

Have any of these sparked your imagination? Are there any other hat projects you have tried for using fabric scraps or recycling clothes?

To keep up with hat-making tips and millinery information, sign up for the email newsletter here.
SHARE:

Tuesday, 23 February 2016

Op Shop Makeover: Boring straw to boater hat

It's been a while since I've done a hat refashion, but with my stack of rescued op shop hats reaching to the ceiling and a desire for a boater hat to call my own, a hat makeover was calling me.

I didn't take a before picture, but I'm sure you can imagine it. A plain, round crowned, broad brimmed straw sun hat, looking a little tired and dusty, blending in with all the other perfectly respectable but a dime-a-dozen straw hats.

A bit of blocking, wiring, and trimming later...


It is far from perfect, with some flaws in the straw and my quick curve cutting, but at an estimate materials cost of under $5, I'm a happy little hat wearer.


If I don't look it, it's just a reflection of how I feel about taking photos of myself.


Celebratory milkshake time!

Now to take some inspiration from these stylish boater-wearing ladies as I strut around in this during the last of the summer sun.
SHARE:

Tuesday, 2 September 2014

1950s pompoms, faux fur, and a bit of cheating

Continuing on with the recent photo shoot images, today I want to show you two of my own 1950s-inspired designs that my friend Ruanne modelled for me that day. (I'll be getting back to my genuine vintage collection later.) These are a couple of very wintery models, appropriate as we say goodbye to winter (although there is still time for more - that snow in October will not quickly be forgotten) and in the other hemisphere Autumn is beginning and maybe some are looking forward to cool-weather fashions.

You may remember a couple of fashion illustrations in my 1952-1954 hat fashion trends post that featured pompoms. Very shortly after posting that, I had a go at a hat inspired by these shapes.


After the fun I had starting to re-use my old favourite red coat, I decided it was time to retire my white/cream coat as well. Some bits were not so white anymore, even after cleaning.

Between some of the whiter parts of the coat fabric, a couple of its buttons, and a bit of lovely white faux fur I had left over from cossack-hat-making, and the crown from an old synthetic straw hat (that's one lazy and quick way to get a crown to start draping on), I put together this homage to the pompom hats of the 1950s.


Despite being a very wintery hat, it managed to pair well with some very colourful dresses on an unusually sunny and warm winter day.

I wore it myself the other day to the Norman Lindsay gallery with my grandmother for an exhibition of World War I photographs. It was fun and cute hat to wear out and about. You can't help but feel cute with a pompom, I think.


This second hat is where the cheating comes in.

I'll start at the beginning. I love the big flat or slightly rounded fifties hats trimmed with fur or feathers that hang like a fringe over the wearer's face. One example, although from the sixties, is the fabulous hat from the first scene with Deborah Kerr in Marriage on the Rocks, which I talked about here.


I found a lovely big round wooden bowl for a few dollars at an op-shop, and I knew it would be a great shape to block this type of hat on. I also found the fabrics I needed by op-shopping - a long-pile fur from a vest (oh yes indeed, it was really something!) and a long velvet skirt.

I had one thing I wasn't sure of though. I didn't know how best to shape this hat, on the underside. How would it actually be worn? I debated a variety of ideas, and in the end just made the thing and hoped for the best.


This turned out to be not such a great idea. Being flat on top, it is almost impossible to wear!

So why did I continue and take it to the photoshoot?

I guess it is a test-of-concept. I wanted to know if it would be worth altering or re-making this hat, and how best to do so, by seeing it in action, with the right outfit, model, makeup etc. I could see how it looked at different angles.


A hat often doesn't show its true strength and beauty without being worn. As tricky as it was to play around with this awkward hat on the day, it was worth it.

Although it is always going to be a statement piece, I love some of these photos so much, that I believe I can make the hat work after all. And if I can't, I got some beautiful images from it anyway!


What do you think? Do you think the fur hat is worth an attempt at redemption? Would you ever actually wear it?

And how desperately do you want a hat with a pompom? It's ok, you can admit it.
SHARE:

Friday, 13 June 2014

Maternity Style with a Hat: 17 weeks

This post makes me happy, as the intersection of such a lot of directions I've been wanting to pursue. Wearing more hats myself, putting more effort into my outfits, chronicling my pregnancy, and refashioning old items into new hats.

As a maker of hats, I've been pushing myself to wear them more, but much of what I make is not casual everyday wear suited to my regular life. I've started wearing berets a lot, and with winter weather settling in here in the Blue Mountains, I'm happy that I have finally made myself one. In fact, I'm on a quest to make myself the perfect beret. This is just round one!

I've combined taking photos of the beret with my first set of maternity photos. The bump looks a lot bigger from up there than it does through the camera lens.

Maternity style with a hat: 17 weeks

Building a maternity wardrobe has been an exciting exercise. Having to adapt to a new silhouette and different styles than I am used to forces me to think differently about clothes. I also had an excuse to buy a lot of new (to me) clothes at once, and I did the most focused shoppping I've ever done! I actually did some of the activities that are always recommended for building an organised and coordinated wardrobe, like creating a Pinterest board of looks you like, and looking for gaps in your existing wardrobe.

Maternity style with a hat: 17 weeks

Having said that, this dress I actually bought pre-pregnancy, thinking it might suit a 1960s hat photoshoot. It won't last me for much longer, because it has no stretch, and the extra room it has is close to running out. But I love the cute polka-dots and I love pairing it with red accessories.

Maternity style with a hat: 17 weeks

I had a guiltily-joyful time doing trigonometry to translate the proportions I wanted for my beret into pattern pieces. I drafted the same basic shape in a six-panel and eight-panel pattern, so I will be testing the eight-panel next. I like the overall shape, but I definitely want to tweak it further to be perfectly happy.

Tanith Rowan: Six panel red wool beret

The fabric is a bright red 100% wool fabric that used to be the sleeves of my favourite coat. I feel that in refashion projects, you need to show a truly tragic before photo, so that your final result looks even more impressive. In this case, however, my coat was always lovely. It was just almost worn through at the elbows and starting to thin out in other places too.

I wore my red coat almost every cold day for about 6 years, often wearing it all day while teaching in the cold school building! One of my students called me "Miss-with-the-red-coat".

Here is my unusually-positive before photo, one of my favourites, from a trip about 4 years ago to the Hunter Valley Gardens. Coincidentally I'm wearing one of my not-made-by-me berets that inspired me to start on my own.

Hunter valley gardens: running away with the dish and the spoon

One thing I love about refashions is using bits of existing structure to make features on the new item, like using one of the coat buttons to top off this beret. And, of course, that a piece of clothing I loved so much and wore for so long, gets to stay a part of my wardrobe.

Tanith Rowan: Six panel red wool beret

By making this just from the sleeves, I have all the rest of the coat to play with! You can probably expect to see more red hats in the future.
SHARE:

Tuesday, 25 February 2014

Another Straw Hat Makeover

This time I didn't visit an op-shop for a hat in need of a refashion, but my grandmother Wendy's house. Wendy has a wall covered with old straw hats, many of which she was given by a friend who was trying to get rid of them. They are all very dusty, and a lot of them are pretty battered.

Like the target of today's makeover.


To be fair, the main problems with this hat were dust and being crumpled, both of which would be quick fixes. But under that band lurked secret issues.


This string has been threaded through the straw and left some pretty daunting holes and marks.

So I knew what I wanted: to get rid of the bottom section of the sideband, but keep the nice open woven section just above. Checking what Wendy wanted gave us a vision: something to wear to the shops and out for lunch.

We cut and washed and re-shaped and edged and wired and experimented and tried on until we had something new and fun.


I admit it has some similarities to my last straw hat refashion, and a somewhat 1940s feel again. I must I have some neural paths in my brain that point straight from straw hat to 1940s.


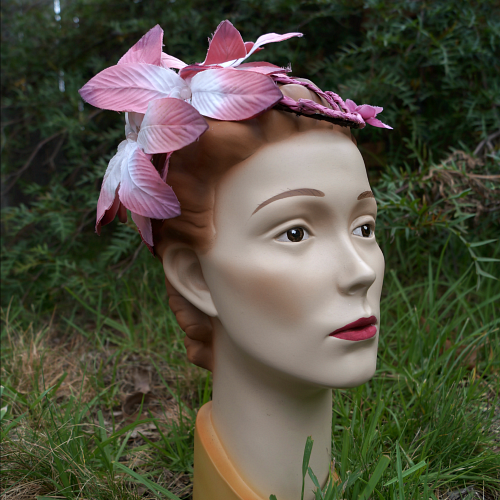
I picked out a range of petals from my boxes of taken-apart-and-washed flowers, keeping to a pink-red-peach-orange sort of colour scheme and tucked the reassembled flowers into all the folds. Somewhat like this one I'd seen floating around Pinterest a few times.


I love knowing I've turned a dust-catching and space-wasting item into something new, exciting and wearable for Wendy.

In other news, it's almost March, which means it is almost sixties time! In case you missed it, I'm talking about the first month in my new blog series "Hats of the Past: a Milliner Explores History".

I am a bit overwhelmed by all the exciting ideas and hats-in-progress, but I have a big week ahead working on finishing everything up as much as possible before the series begins. There is an unusual amount of orange in my craft room!

Also, March will mean the end of the current 25% discount offer for the grand opening of my online shop. Don't forget to use the code TRDopen to get that discount.

I've been slower than I planned in adding new items to the shop, but here are some that have gone up since I opened it.

http://tanithrowandesigns.storenvy.com/products/5633251-red-riding-hood-tudor-style-headdress

This is one of my older hats, a Tudor style French hood inspired by Red Riding Hood. It's still one of my favourites.

http://tanithrowandesigns.storenvy.com/products/5487505-floral-garland

These others have appeared on the blog much more recently. The floral garland and the pink dragonfly hat are both refashions from op-shop purchases.

http://tanithrowandesigns.storenvy.com/products/5445991-pink-dragonfly-hat

Even though I would love to have photos of all my hats on real models, I'm so happy to have my gorgeous display heads for the rest of the time. They are the most instantly-elegant, and the quietest, models I've used and they let me push them around to get the angles I want.

I've discussed the possibility of a new display head design with my talented artist friend, so I'm searching for inspiration images. Do you have any favourite looks for vintage display heads?
SHARE:

Tuesday, 4 February 2014

A Chewed Straw Hat Makeover

Remember this hat I promised to makeover? The one that MacGyver chewed because he wasn't getting enough attention? It's time has come.


I hadn't tackled this one previously because I hadn't worked much with straw braid before, and I knew I would be taking a course using straw braid at the 2014 IMF. So I waited. And I learned about straw braid. I also got some bonus tips and ideas from the lovely Belinda at Peacock Millinery who had done some amazing refashions with op-shop straw hats. I was inspired.


During the week at Wagga, I politely suggested to Belinda that I might try some of the techniques she used on her straw hats, if she didn't mind. Being the open and generous soul that she is, she said that was fine, and that anyway hats always turn out totally different even if you are trying to achieve something similar.

She was very right. I realised as I started working that I wanted something more everyday-wearable and with a vintage feel, rather than a racing fashion style to it.


The most important idea I got from watching her work was a different mental approach to the material, making me realise how much more I could do with it.


Having said that, it really has ended up quite traditional, but I'll try some more different things in future.


After all, there are plenty of straw hats in the op-shops out there. In fact, I picked up another one just last week. It's already progressing in a different direction. In fact, two different directions!


I've also been tidying and reorganising my crafting space. I've included a new feature that I call The Decision Wall, even though it's a shelf really. Ok, it's the top of two tool shelves.

It's a place for all the half-done pieces that are waiting for something. Usually they are waiting for a decision. What kind of fabric? What kind of trim? Does this trim look any good? Is this enough? Too much? Is it secretly ugly and I'm just too emotionally involved to see it?

I love the decision wall. It's making my neurotic creative process flow much more smoothly!
SHARE:

Monday, 6 January 2014

Another Op-Shop Hat Makeover in Pink Sinamay

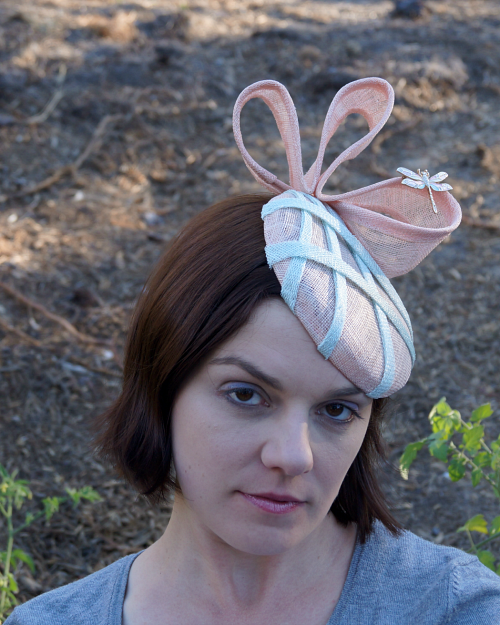
Today the sister hat to the blue straw and sinamay that I re-fashioned earlier gets its own time to shine. It began life as a pale pink sinamay hat blank in a Spotlight store somewhere. After being put on sale, it somehow made its way to an op-shop in Penrith, then came home with me to get a new look. Perhaps something less boxy? I think so.

Before photo of pink sinamay hat

First, I pulled the crown and brim apart and re-blocked the crown. I had an idea of how I wanted to use the brim but I didn't know what else to trim it with, and what other colour(s) to introduce. So I rummaged through my bits and pieces until I found the answer.

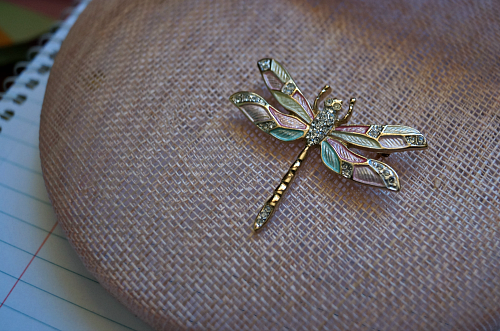
Dragonfly brooch with pink and blue-green

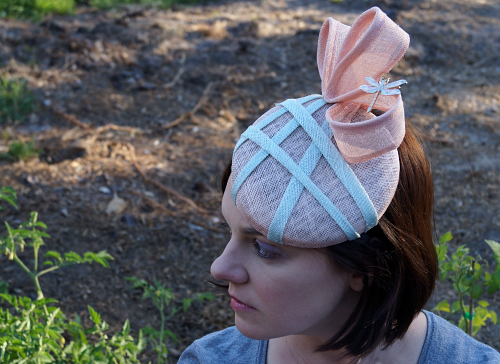
Now I had some colours to work with. I found some pale bluey-green sinamay left over from my first sinamay hat, made some bias strips and played around.

After photo of pink sinamay refashioned hat

In front of my dirt patch. I'm very proud of it. Actually there are some tomatoes there, looking quite promising.

Alternate view of pink sinamay hat

The dragonfly brooch came from a charity shop in Chester and cost me one pound. To keep the refashioning options open into the future, I kept it as a brooch and it can be removed (or just moved around) in the future.

Before and after photos

Time to hit the op-shops for more!
SHARE:

Friday, 6 December 2013

Ready for some makeovers

After learning about straw and sinamay, I'm keen to practise some more. But I'm trying to save money and be ethical, so for now I've been keeping an eye out at op shops.

Here are some pieces waiting to have their makeovers.


This was actually not in terrible condition when I bought it for $2 at Vinnies, and I was entertaining turning it into my new gardening hat.

But apparently if I didn't want it eaten by a cat, I shouldn't have gone into the bathroom for 2 minutes while he wanted attention.


This bow was what drew me to the hat in the first place. It's so cute!


Then I picked up this ones from the Salvos for $3. (Along with the blue one from my most recent hat refashion.)


A bit of pale pink sinamay is bound to be useful, and $3 is the right price.


Looks like I got a bargain.

Finally, an old straw hat. $0. Left by someone in the Maths staffroom x years ago, where x is a large number.


Stay tuned for transformations.
SHARE:

Sunday, 1 December 2013

A Straw and Sinamay Op-shop Hat Refashion

Some hats are just in serious need of a makeover.


I picked this up at an op-shop, hoping to rescue it from its current, rather sad, state. It turns out this is a hat base from Spotlight (so NOT intended to be worn like this, without any trim or anything) which makes me feel better!

The original price tag: $34.95
Sale price at Spotlight: $5
Price at the op-shop: $3


I was looking forward to having some straw and sinamay to play with, and I ended up using some of each in the new hat. I blocked the straw over one of my lovely new handmade hat blocks, then used the band of sinamay and some (also second hand) flowers and buttons to finish it off.


And I still have the brim and a strip of straw to play with! I love hat refashions!

SHARE:
Blogger Template Created by pipdig