Tuesday, 8 December 2015

"Squirrel and Oak" Whimsy Design for December

Back in August, when I made the Scottie Dog whimsy, I asked for suggestions of other animals that would be cute on the veil of a design. Kate-Em suggested squirrels, paired with acorns, and I just loved the idea. I had been contemplating acorns on a whimsy for a while, and squirrels were the perfect complement as well as being an animal I love.


There are just a few squirrels running around the bottom of the veil, and one sitting at the top near the cluster of leaves and acorns.


My acorns were inspired by some amazing ones my sister made in an embroidery class. I was going to show you a picture of this inspiration, except that it would look like one of those "Saw it on Pinterest. Nailed it." memes and my pride is too sensitive. Still, I think my method was likely quicker, and it was fun to make. Anything that involves blocking felt over beads has got to be good. It felt like I was making the world's tiniest hats.


 It has ended up very autumnal, which I like, even it is currently Autumn in zero places in the world.


My lovely friend Ruanne, who you have seen model for me many times in the past, came up to the mountains with her family for a picnic in the park combined with a modelling session. I'm sure I've said it before, but I have the best friends!


Now I've done something tricky with this whimsy, which I've been planning to do for a while, but I hadn't quite worked out how to make it work. While whimsies are fun and very glamorous, they aren't necessarily something for everyday. So I made this one a bit more versatile.


Ta-da! The top part is a clip that can be removed and worn separately, for when a veil is just too much. Or you aren't in the mood for squirrels? Is that possible?


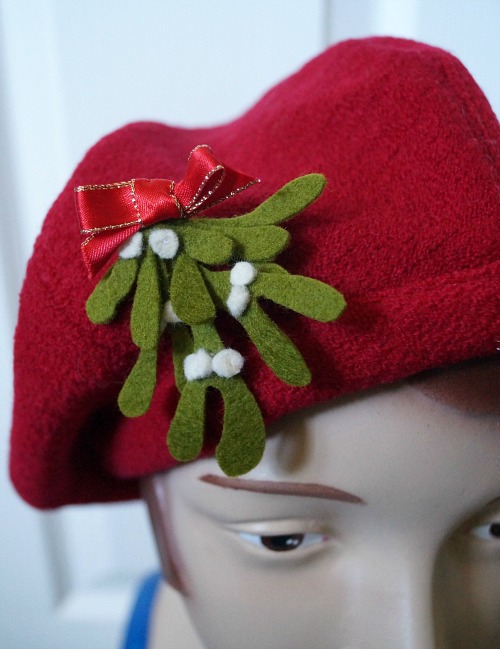
We also shot some other pieces, including the Christmas mistletoe whimsy, which I had only briefly shown you along with the Mistletoe Brooch tutorial.


It matches so beautifully with this blouse, which Ruanne made herself (from the Sencha by Collette Patterns, I believe).


Working out what type of hat wearer she is. We decided on "The Sophisticated Young Married or Businesswoman".


All of which brings us to the conclusion of the Bring Back the Whimsy series!

Bumblebees, Whimsy Tutorial, Choc Chip, Autumn Leaves, Leopard Print is a Neutral, Strawberry Blossoms, Ladybugs, Scottie, Bridal Whimsy, Candy Corn, Mistletoe, Squirrel and Oak.

Looking at them all together makes me feel pretty pleased with myself! I had such a great time exploring fun novelty themes, trying out new trim ideas and techniques, getting reacquainted with fimo, cutting shapes out of felt, working out how to make bees, and playing with veiling. I'm looking forward to bringing some of these themes and techniques into future hats and hair accessories too.

Thank you all for joining me on my year of whimsies. I hope you had fun and maybe even made yourself a whimsy following the tutorial.

Do you have a favourite from the series? I would have a hard time picking one myself!
SHARE:

Wednesday, 11 November 2015

Christmas Felt Mistletoe Brooch (or Hat Pin) Tutorial

When making my mistletoe whimsy, I was really enjoying playing with felt mistletoe, so I decided to also make a brooch version that could also be worn as seasonal trim on a hat.
Mistletoe Brooch or hat Pin Tutorial by Tanith Rowan

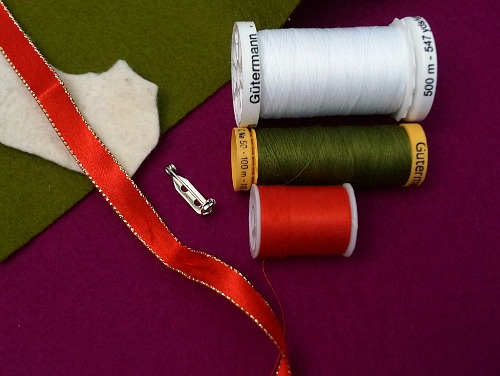
So let's get into it. You will need:

  • Green felt, approx. 10m by 10cm, can be in smaller scraps (I used 100% wool, 1mm thick)
  • White felt, a small scrap of a few square cm (I used some hand-felted wool from a friend, about 1-2mm thick but varied)
  • Red ribbon, approx. 15cm long (mine is gold-edged, 1cm wide, some kind of cheap craft ribbon from my stash)
  • Matching threads
  • Needle
  • Brooch clasp
  • Sharp scissors

Skills required

  • Hand stitching. You don't need any particular "stitch", you are just going back and forth through the materials to hold them in place, but you need to be able to thread a needle and tie a knot in the end and so on. (Having said all that, you can just use glue if you like!
  • Um...that's it!
Mistletoe Brooch or hat Pin Tutorial by Tanith Rowan

(Let me explain right here about my background colour. I wanted a solid background but not white, so that the white felt would show up. I used this fuchsia pink felt, but its colour showed up totally differently in different photos! Oops!)

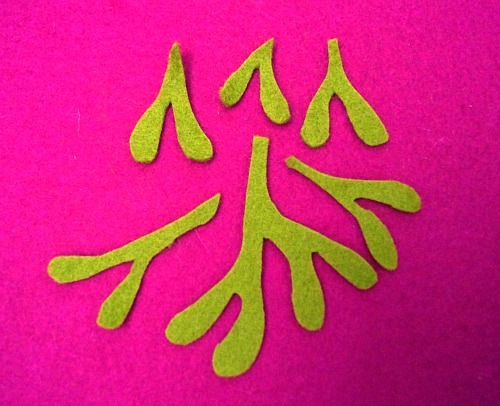
Cut out your mistletoe leaves. Here is a picture of mine. I cut freehand based on looking up images of mistletoe. I had to make sure I searched for real mistletoe, since a lot of results were clip art and illustrations, and a lot were also actually holly!

Mistletoe Brooch or hat Pin Tutorial by Tanith Rowan

But if you aren't confident at that, fear not! I turned mine into a pattern for you. Literally. I turned that image into a pattern rather than drawing one. I'm not sure if that's lazy or efficient. Print this out at approximately one quarter of an A4 page. Cut each shape out. I recommend tracing around with an erasable pen as the easiest way, then cutting out. This also allows you to get an efficient layout on your felt.

Mistletoe Brooch or hat Pin Tutorial by Tanith Rowan

Thread your needle with green thread and knot the end.

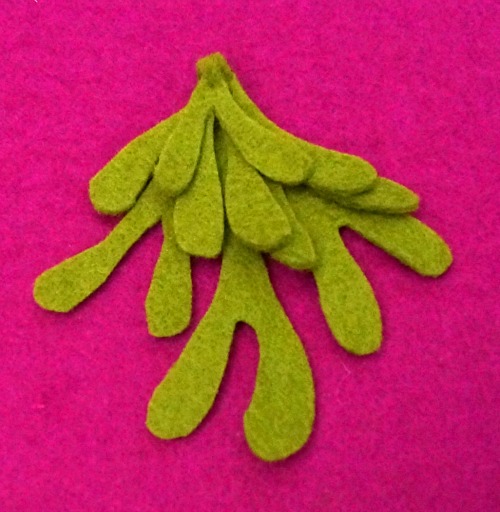
That big piece is your base. Layer the others on top and sew them on, using a couple of stitches through the top of each one. Add the bigger pieces first, then the smaller ones on top.

Mistletoe Brooch or hat Pin Tutorial by Tanith Rowan

Cut out 8 small circles from the white felt. If they don't look round enough, rub them around between your fingers a bit as well. Place them on your mistletoe in pairs, with each pair located at the top of a pair of leaves. Thread your needle with white thread and knot the end.

Mistletoe Brooch or hat Pin Tutorial by Tanith Rowan

Stitch the berries on using the white thread and a stitch or two per berry. Start and finish the thread again for each pair so you don't have a long stitch between them at the back.

Take your ribbon and cut into a longer and shorter length (about 10cm and 5cm). Cut the longer piece on an angle at each end. Thread your needle with red thread and knot the end.

Mistletoe Brooch or hat Pin Tutorial by Tanith Rowan

Fold the longer piece into two loops and two ends, the loops and ends of the bow.


Stitch these folds in place with a few stitches.

Take the shorter piece and wrap it around the centre of your bow, and stitch that in place at the back of the bow.

Stitch the bow to the top of your bunch of mistletoe.

Mistletoe Brooch or hat Pin Tutorial by Tanith Rowan

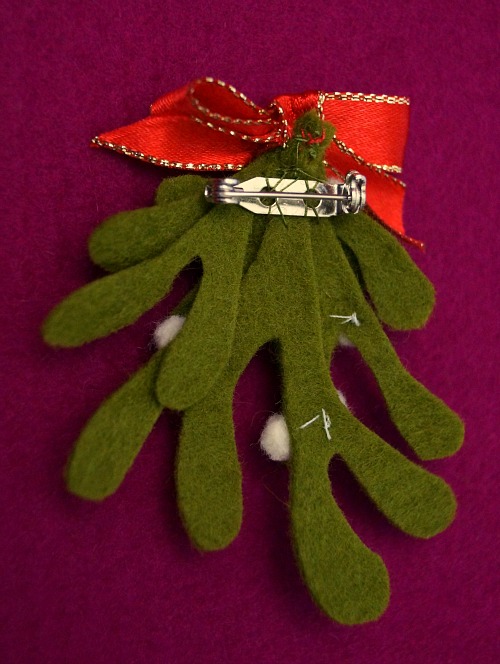
Turn your brooch over. Thread your needle again (I used green but it doesn't really matter for this part) and get your brooch clasp. Sew the clasp on to the upper central part of your felt.

Mistletoe Brooch or hat Pin Tutorial by Tanith Rowan

Clip your brooch on! Wear it as a brooch or trim a hat with it. Or a bag! Or...whatever!

Mistletoe Brooch or hat Pin Tutorial by Tanith Rowan

Suggested variations:

  • Use small white beads instead of felt for the berries
  • Add a tiny bell! I collect the ones from Lindt bunnies and so on, so I have them on hand for crafts
  • Use an alligator clip instead and pin straight into your hair
  • Make a cute felt bow instead using thin red felt
  • Change it up completely by cutting holly leaves instead and making red berries


I know that some people like Christmas preparations to wait until closer to the day itself, but I'm not one of them. There have been a lot of Christmas songs playing around here, and it honestly has put me in the best mood! (And it inspires my Christmas creating too)

I hope you enjoyed the tutorial. If you use it, I'd love to see what you make :)
SHARE:

Tuesday, 25 August 2015

"Scottie" - Tartan and Scottish Terrier Whimsy Design for August

My inspiration for this month's whimsy comes from one of the fluffiest and most adorable breeds of little pup, the Scottish Terrier.

Scottie Dog vintage style whimsy veil hat

I haven't been in a dog-owning household since we left our golden retrievers behind in America, when I was seven years old. They were bigger than me, and could bowl me over completely, but I don't think that bothered me at all.

Scottie Dog vintage style whimsy veil hat

Despite being more of a cat-lover, when it comes to my personal pet preference, I do love dogs too. And I have always liked Scotties. In fact, a very scribbly fluffy Scottie was the main character in a little comic strip I (very) briefly drew when I was about 11 years old.

Scottie Dog vintage style whimsy veil hat

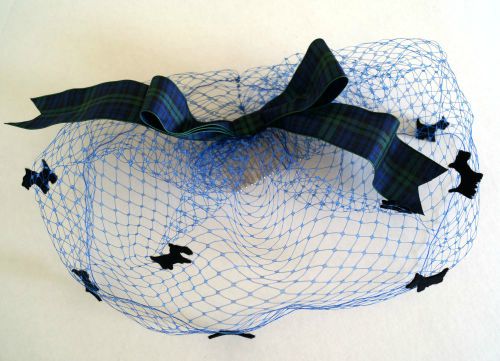
Strangely, in all my brainstorms of possible whimsy themes, I hadn't considered Scottie dogs, but once the idea was in my brain, I couldn't make it fast enough. And I knew I had this ribbon, with the Black Watch tartan pattern, in my ribbon box, just waiting for an opportunity like this.

Scottie Dog vintage style whimsy veil hat

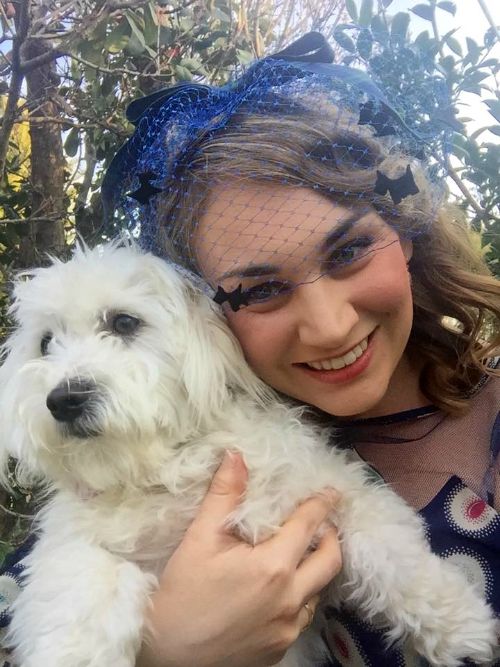
Mel's Maltese puppy doesn't seem to mind posing with a whimsy featuring a different dog, which just goes to show you that dogs have a less jealous temperament than cats. I'm sure cats would object to such scandalous ideas.

Scottie Dog vintage style whimsy veil hat

The felt dogs are cut out freehand, so they are all a bit different!

Scottie Dog vintage style whimsy veil hat


A nice addition to the year of whimsies collection, I think.
 
Are there any other animals that you think should grace the veil of a whimsy?
SHARE:

Friday, 31 July 2015

Ladybugs Whimsy Design for July

This month I managed to wrangle someone else to model for me, even though it meant only just squeezing the July whimsy on to the blog by the end of the month!


For this month's theme, I chose ladybugs. When I was a young girl, I remember my mum receiving a package in the mail, labelled "live animals" that contained a large quantity of live ladybugs. They were released in our garden to tackle an aphid problem. I thought that was pretty cool.


Ladybugs are these tiny warriors, fighting for the cause of vegetables. A poster-child for Good Bugs.


Last spring, I was really excited to see a lot of ladybugs in my vegetable garden, because they are so cute, but then  I realised that of course they were there because of a large number of aphids. Darn.


No broad beans for me!


My little handmade ladybugs aren't going to defend you or your garden against aphids, but they do have the cute factor.

This whimsy is quite a "make do" kind of project, because I decided to work with the materials I had, resulting in me polka-dotting my own ribbon. I can't tell if that is lazy or the opposite!


My model is local musician Snez. She suggested that we take some photos with her playing guitar, but then we both forgot about it. Sleep deprivation will do that to you. The photoshoot afternoon was a bit of a hilarious experience in modelling for new mums and separation anxiety, but I'll tell you more about that with some future photos!

Make sure you don't miss out on any posts or other updates, as well as all the fun extras and links, by signing up to the newsletter.
SHARE:

Tuesday, 10 March 2015

"Choc Chip" Baking-Themed Whimsy

It's time for the March whimsy in the Tanith Rowan Designs Whimsy Collection!


This month's novelty theme is baking! I love to bake, especially cookies. Chocolate chip, as well as being a classic, are super-delicious.


The veil is decorated with tiny chocolate chip cookies, and a ribbon bow tied around a small wooden spoon adorns the top. I couldn't resist gingham for a kitchen-centred design!


Does anyone else get a bit funny about deception in photo shoots? I have no qualms about certain lies. I will find the one part of my kitchen that looks vaguely picturesque. I will tidy that part extra. I will move the bins, the compost bin, the plastic bags. I will wear make-up. I will wear a skirt that doesn't quite fit me unless I suck my tummy in a bit. I will wear a dress under a skirt because I don't have a top that works.


But I won't pretend to bake.


These are one of my new favourite cookie recipes. I call them "Banana (Almost) Everything Cookies". They are the "Banana Everything" cookie from "Vegan Cookies Invade Your Cookie Jar", but without the walnuts. And they are fabulous.


You know how you have one friend in your group who is always eating in photos? No? Well, I do. It's me.


If you are wondering why a baking-themed whimsy, apart from an excuse to make and eat cookies, it was a request from my mother in the comments of the first #bringbackthewhimsy post. It is on its way to her now!

Happy Birthday, Mum!
SHARE:
Blogger Template Created by pipdig