Thursday 13 September 2018

Introducing "Cherry Stripe" - a 1940s-inspired snood with striped bows

I have a special Snoodtember present for my vintage-loving crocheters: a brand new (and completely free) pattern for a vintage-inspired snood! We've called her "Cherry Stripe" (Aussie chocolate pun intended).


I was actually inspired by a vintage image of a pretty plaited hair style with three giant striped bows in it, which I thought would translate beautifully into a snood decoration.

As you may know, I'm not a crocheter myself, let alone a crochet designer, so to make this vision a reality I needed a partner with serious crochet mojo. Luckily, I have one in my sister Rhiannon (of Parlour Duck Crafts). She has surpassed my expectations with this design, and written up a detailed pattern so that you can make your own!


Feeling inspired? You can download the pattern now (and it's free!) and get started!

I'm really proud that Rhiannon and I have been able to create a completely new snood pattern to share with you and we would love to see your creations!
SHARE:

Wednesday 15 August 2018

A Family Circle Cover Recreation

Last year, when I found this Family Circle cover from 1958, I knew I wanted to recreate it. It just felt really me. Not just the hats, but the cheerful feeling of it too, drew me in. I ran out of time last year, but this year I got it done!


I wish I had more hats to choose from to match the originals more closely but you work with what you have.


There have been so many great covers created already this month and shared on Instagram. Everyone is doing amazing work and it's so much fun! I look forward to seeing more.
SHARE:

Tuesday 24 July 2018

"My Vintage Cover" is back!

I hope you're in the mood for some vintage image recreations, because "My Vintage Cover" is coming back this August!

Like last year, Nicole of The Artyologist and I are hosting this community challenge and inviting you all to join us in recreating iconic vintage fashion images.


If you want to join in, here's what you need to know:

  • The challenge runs from August 1-31 and you can share your images at any time during the month
  • This is a non-competitive community event, just join in and have fun!
  • Take part on Instagram or on your own blog (if you have one). If you post on Instagram, use the hashtag #myvintagecover, and feel free to tag Nicole @theartyologist or me @tanithrowan as well. If you post on your blog, let us know so we don't miss it and can include you in a round-up post at the end.
  • Although it is called "My Vintage Cover", feel free to choose any vintage fashion image to recreate.
  • When you share your image, share the inspiration image too (or link to it) so that we can see the original too.
  • Don't be daunted by feeling that you have to do a detailed and faithful recreation, you can be as accurate as you want or just recreate some elements of the image.
  • Create as many images as you want to!
  • Feel free to repost the above image to share the news of the challenge around.
Here's a quick recap of my images from last year so get you a bit inspired, and you can see more in Nicole's round-up from last year.


I hope you'll join us - and if not, I hope you'll enjoy watching along!
SHARE:

Thursday 17 May 2018

7 Hat Projects for Recycling Clothes and Using up Scraps

Most hats require smaller quantities of fabric than garments, so they are a great way to use up scrap fabric or refashion garments. After reading Nicole's excellent post on 12 Ways to Recycle Used Clothing and Textiles, I decided to have a think about some specific hat projects that make great scrap-busters and refashion ideas. Here are some of my favourites.

1. A 1954 Butterfly Cap


Intended for velvet or velveteen, and beautiful in those, I have also made this in other fabrics (and intend to again). It takes a small amount of fabric and with clever layout can use multiple smaller scraps. It does require a buckram foundation and wire as well.

I've reviewed and given some tips for this original (and free) 1954 pattern.

2. A 40s-style fabric snood


Whether it's to go with a hat or wear by itself, a snood gives a fun 40s feel to an outfit, and if you can't crochet, you can still make one! Perfect for any fabric with a good drape, super easy to make, and only needing the fabric and a bit of elastic.

All the instructions are here from the Snoodtember Snood-a-long.

3. A classic multi-era beret


My very first beret made with the pattern that would become my Grevillea beret was made from a sleeve of my old favourite coat. Because of the sectioned layout and multiple band width options, you can really make this work out of some odd shaped scraps or old garments. It's great for coats, jackets, and nice trousers as well as project scraps, of course.

You can get the Grevillea beret pattern here.

4. 1939 "Doll's Hat"


Another one for the velvets, but I think it would have a lot of potential in other fabrics, and takes a very small amount to make. It does need wire and buckram for the foundation, but not a lot of those either. The veiling is optional and all sorts of trim could be used.

Read my thoughts on this free vintage pattern.

5. Beach Hat


This one is particularly special because it's intended for regular cotton fabrics, so can use up some cute plain or printed fabrics, and only takes about a fat quarter of material. It's also a really simple pattern, quick to make, and can be decorated for further personalisation.

Another free vintage pattern, I've reviewed and given advice on this beach hat here.

Of course, making a hat from scratch is not the only option. All kinds of trims can be made from small amounts of fabric, and sometimes all a tired hat needs is a little revamp.

6. Retrim an old hat


For this straw hat I've used leftover fabric from a garment sewing project to create the band and the brim binding, and I love the extra colour it adds. In this case the straw was new but the principle applies and it's a great way to freshen up an older and plain hat. Similarly, it's easy to add fabric bows and other special touches, with pretty small amounts of material.

7. Fabric flowers (also ribbon flowers)


While French flower making is pretty complex and requires special (and expensive) tools, there are plenty of quicker and easier ways to make flowers. Ribbon flowers have whole books written on them, and ideas for both ribbon and fabric flowers appear in vintage publications quite often (not always with good instructions though!).

There are many more great hat projects out there for recycling fabrics and using up small scraps (see the rest of the patterns in the Trove Pattern Project as a starting point) but these are some of my favourites.

Have any of these sparked your imagination? Are there any other hat projects you have tried for using fabric scraps or recycling clothes?

To keep up with hat-making tips and millinery information, sign up for the email newsletter here.
SHARE:

Tuesday 10 April 2018

Learning: Crinoline Veils

Last year's learning streak continues this year, and I am still loving my online millinery courses through Hat Academy, to keep my skills moving forward even when I don't have much free time for my craft. Although actually I started this course last year, but I've just bought a couple more and I have a gift voucher from Christmas, so it's definitely ongoing!


This is my first piece using the skills from the Veiled Crowns Deluxe Course, taught by Rebecca Share. The trim is taught in the Leather Flower Crowns course, which I took even though I don't use leather, because I love the style of the halo crowns, which you saw combined with lace millinery in my lace garden collection. And the techniques are proving useful in other ways and with other materials, so I'm really glad of it.


I had hardly even handled crinoline before taking this course, and I loved learning so much about the material. Even though I hadn't yet finished this piece, I used the confidence with crinoline to make a custom hat for Melbourne Cup last year.


The second half of the course is making crinoline spirals, and I think I like that look best, but I'm still working on blinging that piece to the moon and back before you get to see it!


I am looking forward to trying out some of the leather techniques on some alternative vegan leathers, but in the meantime, I tried this technique on a scrap of fake snakeskin that I had been keeping for approximately a million years. I like the texture it brings and I'm happy to have finally used it.

Although there's still more left.


It's far from perfect, and if you've been following along on Instagram you would have seen that this took a few goes to get just right, and it spent a long time sitting on a mannequin before I decided what to do, but it's been a great learning experience. I look forward to sharing more of them with you!

So what do you think of this alternative take on the face veil?

To keep up with my millinery journey and latest makes, sign up for the email newsletter here.
SHARE:

Thursday 1 March 2018

Tutorial: Adding felt appliqué birds to your Grevillea Beret

Today I'm sharing the pattern and instructions for adding some birds to your Grevillea Beret using felt. As you know, I love felt, I love berets, and I love birds on hats, (I really love birds on hats.) so it's about time to combine all three!


You will need:

Your Grevillea Beret pattern and all the usual material and tool requirements for it*
Thin felt (1mm thickness is good, and I prefer 100% wool)
Embroidery floss to match your felt
Appliqué birds pattern, printed out

*Look obviously you could use a different pattern or appliqué onto a beret you already own, but let's not dwell on that idea too long.


Cutting out your birds:

I printed my pattern on to regular paper, cut the pattern pieces out, traced around them with an air-disappearing pen and cut the pieces from the felt. I found this to be OK, but it did require some trimming afterwards to smooth out some bits. I think a better method would be using freezer paper, although I know it's not as easy to find in Australia.


Note: the birds have very narrow sections on the tails that pull apart easily. Handle the pieces very carefully. You may even want to consider cutting them wider at first and trimming just before you sew.

Sewing the birds on:

As you are working through construction of your beret, you want to add the appliqué at the point where your crown is complete, but before you add lining (if you aren't adding a lining you could add an appliqué at any point).

Put your beret crown on a mannequin (or your own head, but that's a bit trickier), folding under the seam allowance. Pin your felt shapes in place and rearrange them until you are happy with the layout.

Sew your felt shapes in place one by one using two strands of embroidery floss. I used a whipstitch, following this video tutorial by Wendi Gratz. Others suggested blanket stitch, so I would recommend looking at both and deciding which you prefer. I liked the simple option and it seems to have worked well.


Note: that advice above about the tails? I was not so good at following it myself. I lost two tail ends, so as I stitched the pieces on I had to do a little bit of extra embroidery to replace them. It looks OK from a distance and it's a good way to recover the situation, but I'd recommend trying to avoid the problem instead!

Once your birds are on, proceed to add the lining and the headband and finish off your beret.


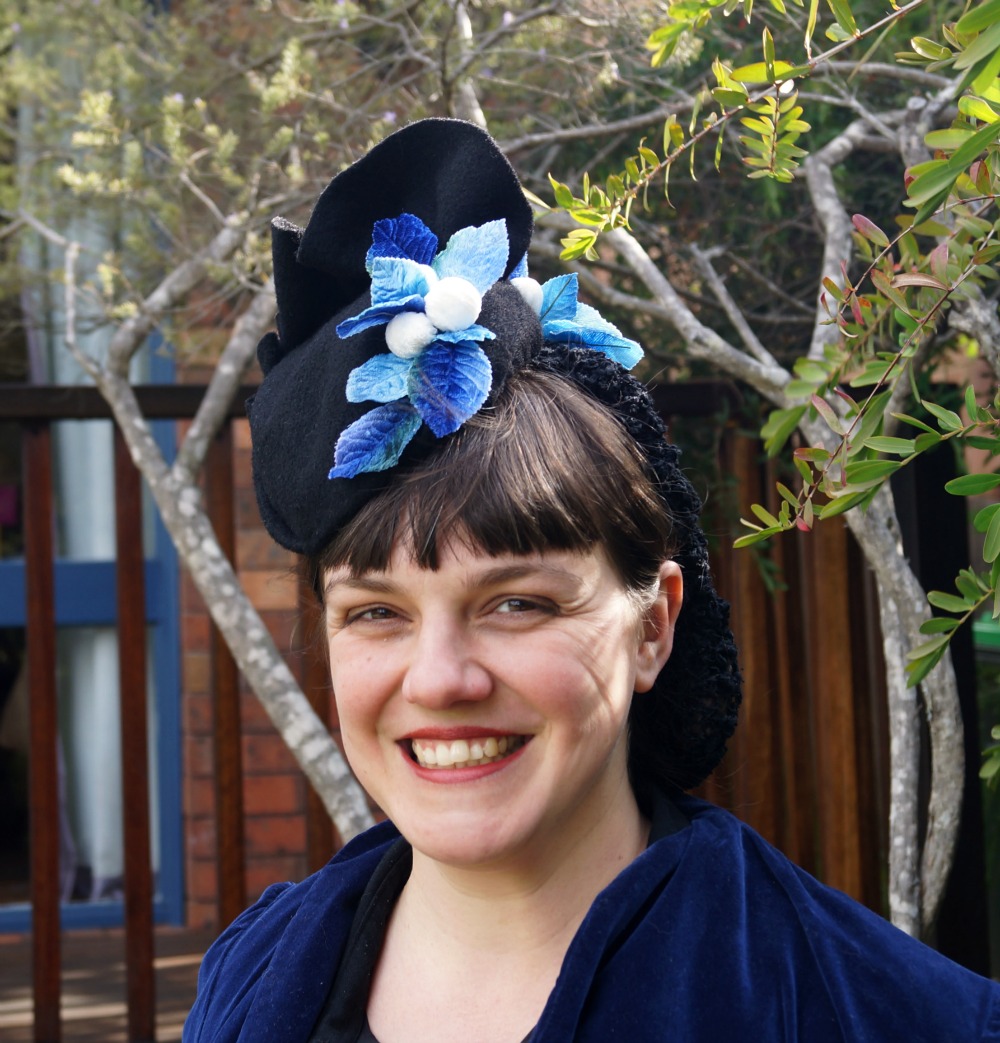
My husband wasn't sure about the black and white, and I think in hindsight I agree, but it does make for good contrast images. I'd like maybe navy with pale grey birds. What colours can you see it in?
SHARE:

Tuesday 28 November 2017

Sisterhood of the Travelling Hat: Tanith

Three years ago I had a newborn baby and I made a felt hat that would travel the world.

 
It was a journey that I expected to take a year, that ended up taking three, when it should have taken two. It's been a year since Adelaide, as we named the hat, came home to me, hand delivered by my sister, who was the last person she visited.


At that time I was pregnant, exhausted, not fitting into most of my clothes, and not really feeling like being the subject of photos. I did plan to do it anyway, many times, but I made more and more excuses. Time. Energy. Wardrobe. Body Image. Hair. Heat. Rain. Then T-Rex was born and naturally it became even more difficult to get a photo shoot done, and life was even more exhausting. Plus, after all the wait, I felt I should make it a really good shoot. A really good outfit. A special location.


In the end, it wasn't any of those things. But enough was enough! While T-Rex napped, we went outside and my husband took photos of me in front of our deck and a bush in our neighbour's front yard while Teacup played and picked flowers.


And it was enough. Of course it was. I should have known.


Because I have no hairstyling skills, I decided to try the hat with a snood, and I really like how they look together. I threw my Evelyn Wood velvet coat/dress over a black shirt dress and there you have it.


Adelaide came home with many souvenirs, including her decorated hat box. I wasn't sure what I was going to do with her after she came home, but I think I'll have to pack her back up with her treasures and keep her for the future, for my daughter perhaps.

I love how Adelaide's journey is one of so many stories. 8 countries, 18 different women. Some of the bloggers who participated are no longer blogging, no longer present in the vintage community. Some have become close online friends, some I have since met in person as well. And the newborn baby who napped while I blocked this felt is now a chatty three-year old, with a baby brother.

Thank you all so much.
SHARE:
Blogger Template Created by pipdig