Tuesday, 8 December 2015

"Squirrel and Oak" Whimsy Design for December

Back in August, when I made the Scottie Dog whimsy, I asked for suggestions of other animals that would be cute on the veil of a design. Kate-Em suggested squirrels, paired with acorns, and I just loved the idea. I had been contemplating acorns on a whimsy for a while, and squirrels were the perfect complement as well as being an animal I love.


There are just a few squirrels running around the bottom of the veil, and one sitting at the top near the cluster of leaves and acorns.


My acorns were inspired by some amazing ones my sister made in an embroidery class. I was going to show you a picture of this inspiration, except that it would look like one of those "Saw it on Pinterest. Nailed it." memes and my pride is too sensitive. Still, I think my method was likely quicker, and it was fun to make. Anything that involves blocking felt over beads has got to be good. It felt like I was making the world's tiniest hats.


 It has ended up very autumnal, which I like, even it is currently Autumn in zero places in the world.


My lovely friend Ruanne, who you have seen model for me many times in the past, came up to the mountains with her family for a picnic in the park combined with a modelling session. I'm sure I've said it before, but I have the best friends!


Now I've done something tricky with this whimsy, which I've been planning to do for a while, but I hadn't quite worked out how to make it work. While whimsies are fun and very glamorous, they aren't necessarily something for everyday. So I made this one a bit more versatile.


Ta-da! The top part is a clip that can be removed and worn separately, for when a veil is just too much. Or you aren't in the mood for squirrels? Is that possible?


We also shot some other pieces, including the Christmas mistletoe whimsy, which I had only briefly shown you along with the Mistletoe Brooch tutorial.


It matches so beautifully with this blouse, which Ruanne made herself (from the Sencha by Collette Patterns, I believe).


Working out what type of hat wearer she is. We decided on "The Sophisticated Young Married or Businesswoman".


All of which brings us to the conclusion of the Bring Back the Whimsy series!

Bumblebees, Whimsy Tutorial, Choc Chip, Autumn Leaves, Leopard Print is a Neutral, Strawberry Blossoms, Ladybugs, Scottie, Bridal Whimsy, Candy Corn, Mistletoe, Squirrel and Oak.

Looking at them all together makes me feel pretty pleased with myself! I had such a great time exploring fun novelty themes, trying out new trim ideas and techniques, getting reacquainted with fimo, cutting shapes out of felt, working out how to make bees, and playing with veiling. I'm looking forward to bringing some of these themes and techniques into future hats and hair accessories too.

Thank you all for joining me on my year of whimsies. I hope you had fun and maybe even made yourself a whimsy following the tutorial.

Do you have a favourite from the series? I would have a hard time picking one myself!
SHARE:

Tuesday, 24 November 2015

Christmas hats, hair flowers, clips and combs

I haven't shared a lot in the way of small hair clips or flowers on the blog, and to be honest they are not exactly my main priority. But they are fun and I wear them occasionally myself, and make some for my bricks-and-mortar shops and markets (ok, market, singular).

This year I really wanted to make some Christmas items, and although I had a lot of grand ideas that will perhaps one day come to fruition, it was more realistic to make some smaller items. I had a lot of fun with these.


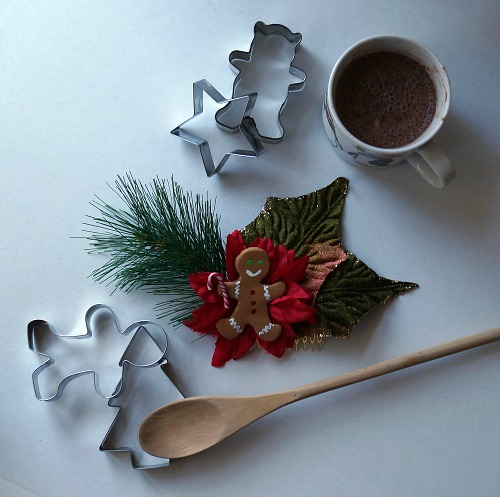
Since Christmas is approaching at a rapid pace, I wanted to get these done and into the shops by mid November. This rush meant, however, that I didn't yet have a model lined up, so for the first time I did a no-model photoshoot. As well as Edie and my other trusty mannequins, I relied on themed props.

www.etsy.com/au/listing/257560642/christmas-gingerbread-man-hair-flower

It was heaps of fun! And I found a LOT of Christmas crap without having to actually get any boxes out of the shed. I'm a little surprised, but I shouldn't be. And also I'm a little proud.

www.etsy.com/au/listing/257459423/peppermint-swirl-christmas-candy-hair

Product photography advice seems generally to be geared towards smaller items. People are always telling you to build your own little light box and set up white background and use a bit of a table and props and I always think "Do you realise how big a hat with a pheasant feather is?" Nevertheless, the information was sitting around in my brain and I finally got to use it!

www.etsy.com/au/listing/257562066/mistletoe-a-christmas-vintage-style

Although don't you hate it when you look at the photos afterwards and realise something wasn't sitting flat and it's that way in EVERY photo?


I still have a long way to go with photography and so much to learn, but I enjoy it immensely and love it when a photo turns out just right. I'd love to get from "not bad" to "actually quite good" one day.

www.etsy.com/au/listing/257564462/winter-themed-miniature-top-hat-in-grey

This is actually an older piece, from my "make all the miniature top hats" phase, but I still really like it and thought that Christmas was a good time to list it!

www.etsy.com/au/listing/257560642/christmas-gingerbread-man-hair-flower

I'm still hoping to squeeze in a modelling session but until then, these will have to do. For the ones that are listed on Etsy, the photos link to the listing. The others will probably be going into bricks-and-mortar shops soon.
SHARE:

Wednesday, 11 November 2015

Christmas Felt Mistletoe Brooch (or Hat Pin) Tutorial

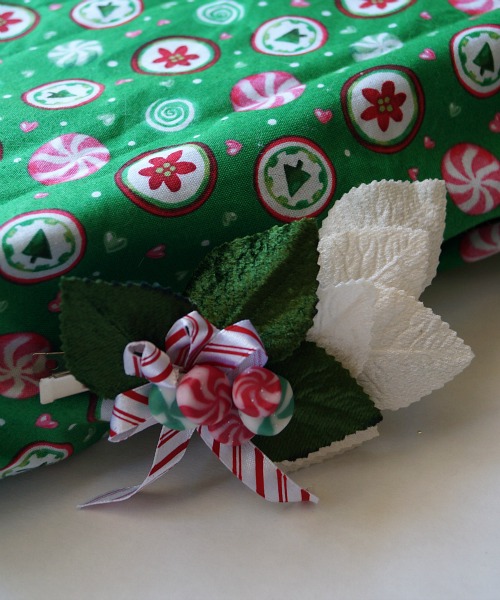
When making my mistletoe whimsy, I was really enjoying playing with felt mistletoe, so I decided to also make a brooch version that could also be worn as seasonal trim on a hat.
Mistletoe Brooch or hat Pin Tutorial by Tanith Rowan

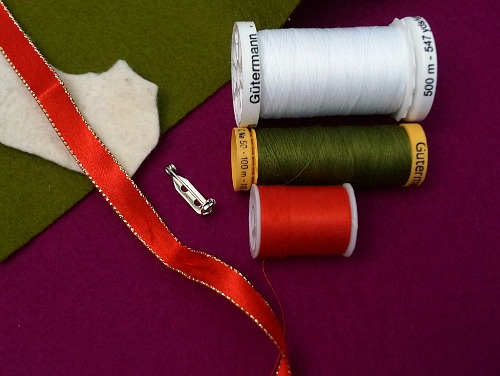
So let's get into it. You will need:

  • Green felt, approx. 10m by 10cm, can be in smaller scraps (I used 100% wool, 1mm thick)
  • White felt, a small scrap of a few square cm (I used some hand-felted wool from a friend, about 1-2mm thick but varied)
  • Red ribbon, approx. 15cm long (mine is gold-edged, 1cm wide, some kind of cheap craft ribbon from my stash)
  • Matching threads
  • Needle
  • Brooch clasp
  • Sharp scissors

Skills required

  • Hand stitching. You don't need any particular "stitch", you are just going back and forth through the materials to hold them in place, but you need to be able to thread a needle and tie a knot in the end and so on. (Having said all that, you can just use glue if you like!
  • Um...that's it!
Mistletoe Brooch or hat Pin Tutorial by Tanith Rowan

(Let me explain right here about my background colour. I wanted a solid background but not white, so that the white felt would show up. I used this fuchsia pink felt, but its colour showed up totally differently in different photos! Oops!)

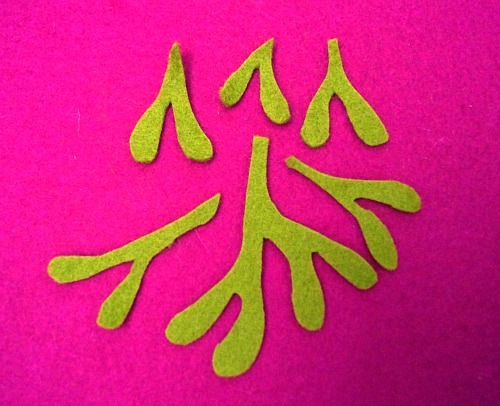
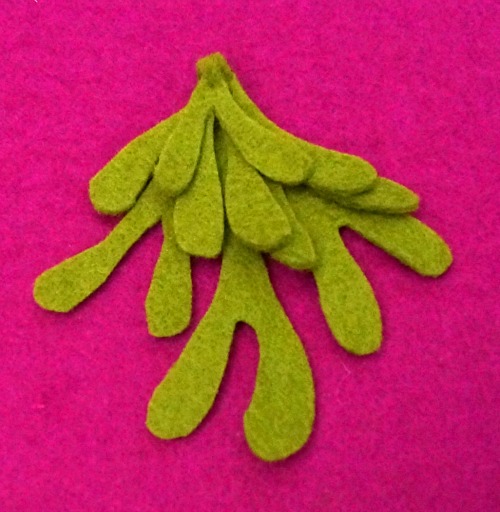
Cut out your mistletoe leaves. Here is a picture of mine. I cut freehand based on looking up images of mistletoe. I had to make sure I searched for real mistletoe, since a lot of results were clip art and illustrations, and a lot were also actually holly!

Mistletoe Brooch or hat Pin Tutorial by Tanith Rowan

But if you aren't confident at that, fear not! I turned mine into a pattern for you. Literally. I turned that image into a pattern rather than drawing one. I'm not sure if that's lazy or efficient. Print this out at approximately one quarter of an A4 page. Cut each shape out. I recommend tracing around with an erasable pen as the easiest way, then cutting out. This also allows you to get an efficient layout on your felt.

Mistletoe Brooch or hat Pin Tutorial by Tanith Rowan

Thread your needle with green thread and knot the end.

That big piece is your base. Layer the others on top and sew them on, using a couple of stitches through the top of each one. Add the bigger pieces first, then the smaller ones on top.

Mistletoe Brooch or hat Pin Tutorial by Tanith Rowan

Cut out 8 small circles from the white felt. If they don't look round enough, rub them around between your fingers a bit as well. Place them on your mistletoe in pairs, with each pair located at the top of a pair of leaves. Thread your needle with white thread and knot the end.

Mistletoe Brooch or hat Pin Tutorial by Tanith Rowan

Stitch the berries on using the white thread and a stitch or two per berry. Start and finish the thread again for each pair so you don't have a long stitch between them at the back.

Take your ribbon and cut into a longer and shorter length (about 10cm and 5cm). Cut the longer piece on an angle at each end. Thread your needle with red thread and knot the end.

Mistletoe Brooch or hat Pin Tutorial by Tanith Rowan

Fold the longer piece into two loops and two ends, the loops and ends of the bow.


Stitch these folds in place with a few stitches.

Take the shorter piece and wrap it around the centre of your bow, and stitch that in place at the back of the bow.

Stitch the bow to the top of your bunch of mistletoe.

Mistletoe Brooch or hat Pin Tutorial by Tanith Rowan

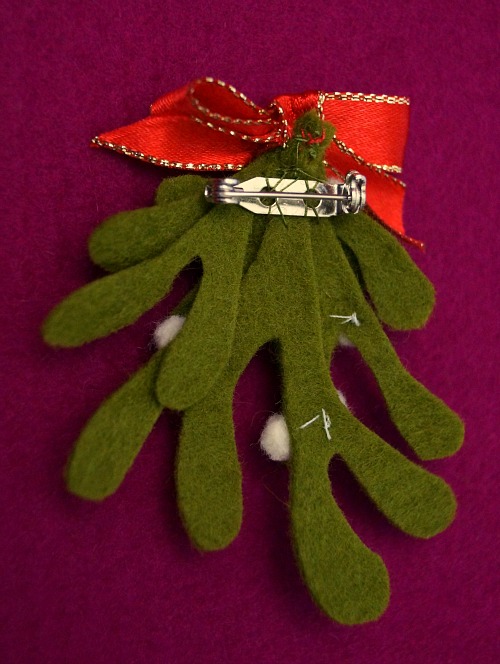
Turn your brooch over. Thread your needle again (I used green but it doesn't really matter for this part) and get your brooch clasp. Sew the clasp on to the upper central part of your felt.

Mistletoe Brooch or hat Pin Tutorial by Tanith Rowan

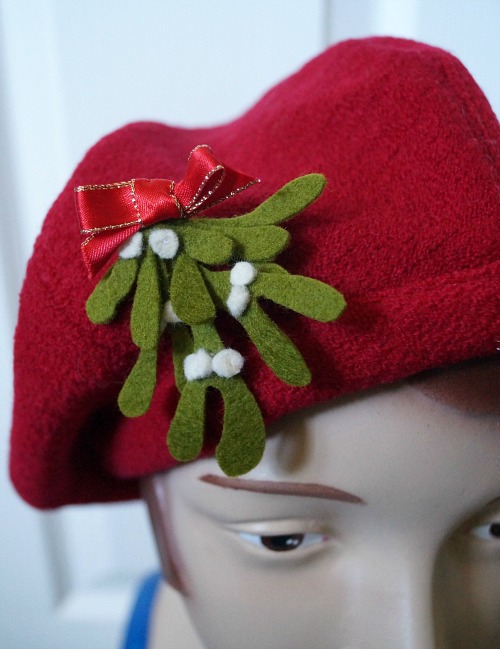
Clip your brooch on! Wear it as a brooch or trim a hat with it. Or a bag! Or...whatever!

Mistletoe Brooch or hat Pin Tutorial by Tanith Rowan

Suggested variations:

  • Use small white beads instead of felt for the berries
  • Add a tiny bell! I collect the ones from Lindt bunnies and so on, so I have them on hand for crafts
  • Use an alligator clip instead and pin straight into your hair
  • Make a cute felt bow instead using thin red felt
  • Change it up completely by cutting holly leaves instead and making red berries


I know that some people like Christmas preparations to wait until closer to the day itself, but I'm not one of them. There have been a lot of Christmas songs playing around here, and it honestly has put me in the best mood! (And it inspires my Christmas creating too)

I hope you enjoyed the tutorial. If you use it, I'd love to see what you make :)
SHARE:

Tuesday, 30 December 2014

Vintage Secret Santa (and Santa in general)

The glow of Christmas is lingering in my house, and the piles of lovely presents I received remain under the Christmas tree, reminding me how spoiled I am and of all the exciting things I have to explore and enjoy. I want to share just some of the fun things that came my way this year, for Christmas and my birthday the week before.

Firstly, there was the "Vintage Secret Santa" organised by Jessica of Chronically Vintage. What a fantastic idea and an amazing amount of fun. I'm feeling a little guilty because I'm not sure my present has arrived yet (or at least, she hasn't posted anything about it on instagram). My present arrived from Norway on Christmas Eve, which was an exciting moment, additionally so because I discovered that my gifter was also a participant in the Sisterhood of the Travelling Hat!


My little gift box included an adorable dog brooch, book on Edward Munch, photo frame, bangles, and a Christmas embroidery. I loved that it was not only vintage-themed, but included some specifically Norwegian things to make it feel even more like being a part of some fun global club.

I am eagerly looking forward to next year, if it happens again! I wish there were a few or I could enter multiple times.

For my birthday, I got a new hat block from my lovely husband. It's a cocktail top hat block from Blocks By Design. The brim actually goes up the other way on the hat, it just sits better this way around on a table. I'm looking forward to showing you the results of this!


I seem to have ended up getting a lot of books this year, which is awesome. (Old Hat, New Hat, was actually a present for the little girl, but I'm enjoying it more than her so far.)


My grandmother gave us all a copy of the Gallipoli book because she provided information that is included, mostly quotes from her grandfather's diary (my great-great-grandfather). He was a prolific and entertaining writer, and being a Chaplain and keen amateur historian/archeologist, saw the war experience in an interesting and unusual light at times.


I've been wooed by all the images of Erstwilder brooches on blogs and instagram lately, so when my Dad asked for present suggestions at the last minute, I mentioned them. As it turns out, there is a stockist in the mountains, and he bought me this cute cat! Yay!


My sister included a fat quarter bundle in my "stocking presents". How cute is this lady with her hat-box luggage? I think it would make a sweet lining on a hat.


This is actually another present for my baby daughter, for her to grow into. 3 pairs of vintage gloves in various child sizes.


It's hard to show the detail of the black ones, the first set that will fit, although we will still be waiting a long time for that! It will be worth it!


My Mum has been stalking her local auction house all year for potential presents for us, and consequently got some quirky and fabulous finds!


A large collection of vintage hat pins, in a storage roll she made to hold them. The idea is that I can give the cute ones away when I sell a hat that needs them. So thanks to my Mum, you may get a bonus if you buy a hat from me!

When I opened this next one, I knew there had to be a story behind it.


These three tiny hat on their miniature hat stands, as it turns out, were part of a doll's house haberdasher's shop. She put on a bid that she considered to be very low, but obviously there wasn't much interest, and she got it. She sent me the hats and my sister the counter. Here are the photos of the complete item before she sent it, and the dolls that go with it.


Adorable, right? There is actually a spare hat stand, so I may have to make my own tiny hat to complete the set. What kind should I make?

Edited to add: My sister gave me permission to share this picture, so I can show you a vintage gift I gave, too. This vintage coat and hat, possibly 1940s (but who even cares, look at him!!), and also a yellow corduroy waistcoat underneath. What a darling! "The smartest dressed man I've ever seen," to quote his great-grandmother.

SHARE:

Tuesday, 23 December 2014

Merry Christmas to All


Merry Christmas my lovely blog friends! It has been an amazing and eventful year.


I managed to throw together some Christmas hats. Next year I think a Christmas collection is in order...


I hope you all have a lovely holiday season!
SHARE:

Tuesday, 16 December 2014

Millinery Movie Moments: The Bishop's Wife

Many classic movies feature phenomenal examples of the milliner's craft, but despite being visual showstoppers, they are not often relevant to the plot. I love it when the hats are central to the action, and even have a deeper meaning.

The Bishop's Wife is my number one pick for classic movie moments that centre around a hat. Early in the movie we first see the incomparable Loretta Young as Mrs Julia Brougham gaze longingly through the store window at the coveted hat. It sits behind a frame, covered in folds of ribbon, a frivolous but beautiful confection.


Julia's other hats in the movie are simple by contrast, although of course she still looks stunning in them. It helps to have her face.

They are both plain felt hats with no trims beyond simple bands. The first is, in my opinion, the nicer of the two, with a cute short brim at the front and turn up at the back.


The other is even plainer, but she still makes it work!


Nevertheless, there is a big contrast between these reserved styles and the glorious bonnet in the millinery shop.


When Julia sees the hat being removed from the window, Dudley (Cary Grant) pushes her inside and convinces the woman trying it on that it doesn't suit her - against the best efforts of the salesperson.


"Not everyone could wear such a daring hat. But of course it was made for madame."

Julia consequently is able to immediately buy the hat for herself, and wear it in a scene that makes us all want to ice skate, no matter how uncoordinated we are in reality.


This hat is a symbol of one of the movie's messages, and the lessons that Julia and the Bishop are reminded of - living life to the fullest and feeling young again. Being a bit more free and enjoying the experiences of life. As the cab driver Sylvester puts it, "You know your destination, but you're in no hurry to get there."

In fact, the hat isn't the only accessory with meaning in this movie. There is the scarf that Matilda gave to the Bishop, that he never wears, so she encourages Dudley to wear it."I'm sure he'll appreciate it once he sees it one me." That line sums up the whole movie!


I also love how both Matilda and Mildred start wearing flowers in their hair once Dudley has arrived on the scene. I only just noticed that in this last viewing.


There are also hats in the background that are worth checking out. The women in the street scene at the start, the lunch crowd at Michel's, and even the formidable Mrs Hamilton have some appealing looks to be inspired by. Not to mention knitted caps on the skaters and beanies and hoods on the children in the snow battle.


Do you have any favourite hats from classic movies? Can you think of any others where the hats play a role in the action?

I hope you are all enjoying the holiday season, whatever that means for you. And remember...

The only people who grow old were born old to begin with. You were born young. You'll remain that way.
SHARE:
Blogger Template Created by pipdig