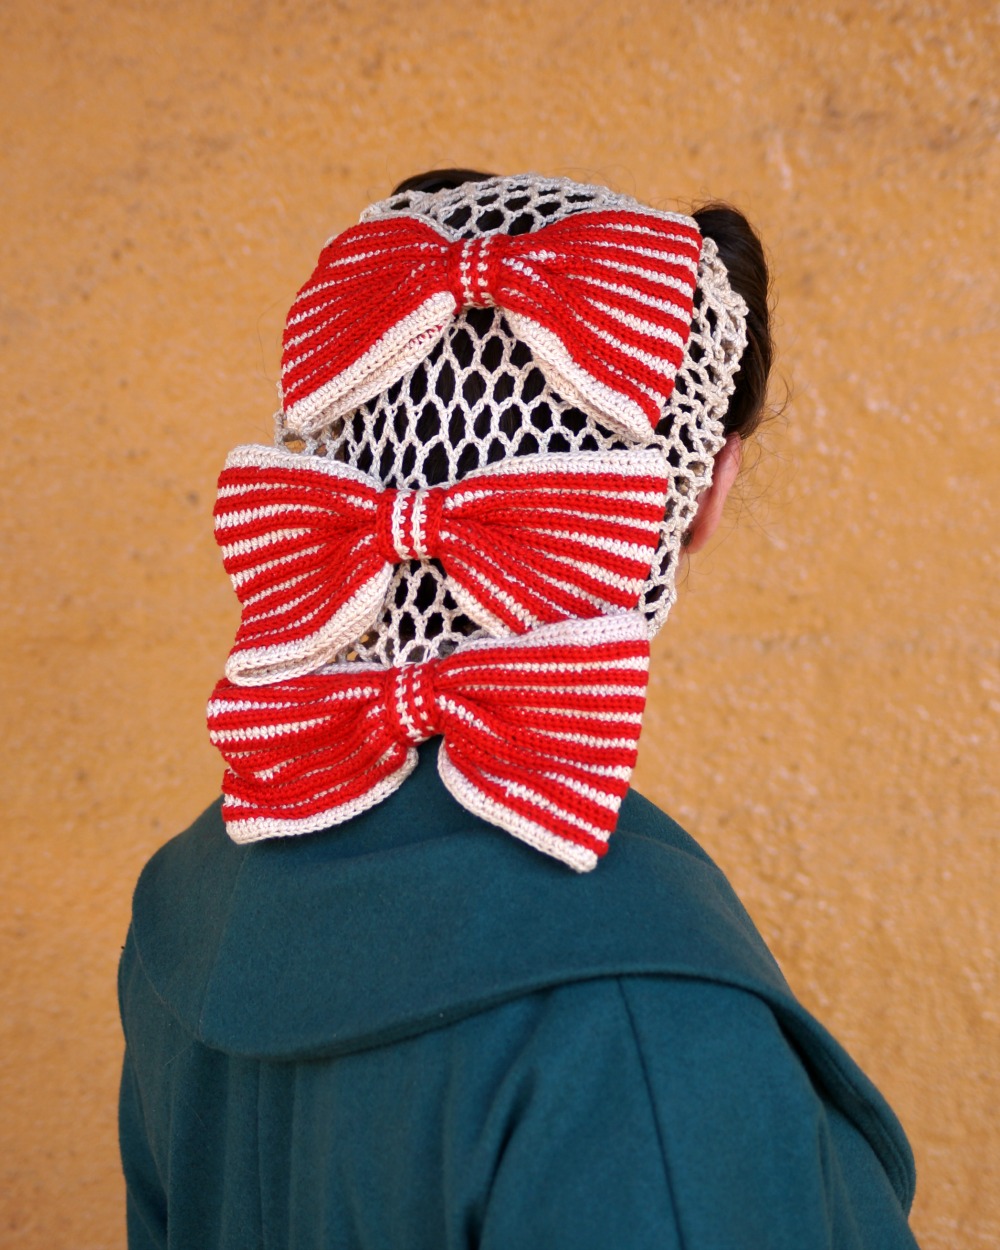
I have a special Snoodtember present for my vintage-loving crocheters: a brand new (and completely free) pattern for a vintage-inspired snood! We've called her "Cherry Stripe" (Aussie chocolate pun intended).
I was actually inspired by a vintage image of a pretty plaited hair style with three giant striped bows in it, which I thought would translate beautifully into a snood decoration.
As you may know, I'm not a crocheter myself, let alone a crochet designer, so to make this vision a reality I needed a partner with serious crochet mojo. Luckily, I have one in my sister Rhiannon (of Parlour Duck Crafts). She has surpassed my expectations with this design, and written up a detailed pattern so that you can make your own!
Feeling inspired? You can download the pattern now (and it's free!) and get started!
I'm really proud that Rhiannon and I have been able to create a completely new snood pattern to share with you and we would love to see your creations!
Thursday, 13 September 2018
Wednesday, 20 September 2017
Reviewing the 1942 Bow Snood Pattern
Last year for Snoodtember, I shared a number of free vintage Australian snood patterns, and asked my sister Rhiannon (of Parlour Duck Crafts) to look over the instructions and tell us how they looked.
One of the most admired patterns was this snood with a bow from The Australian Women's Weekly in 1942 (and yes the jumper pattern is there too!). I loved it, and Rhiannon obviously knew it too because when Christmas rolled around, there was a beautiful bow snood of my very own! (And matching red crocheted gloves.)
So this year, I'm sharing what it's like to wear, and Rhiannon has kindly shared her thoughts and experiences of making it up. Here goes!
One of the most admired patterns was this snood with a bow from The Australian Women's Weekly in 1942 (and yes the jumper pattern is there too!). I loved it, and Rhiannon obviously knew it too because when Christmas rolled around, there was a beautiful bow snood of my very own! (And matching red crocheted gloves.)
So this year, I'm sharing what it's like to wear, and Rhiannon has kindly shared her thoughts and experiences of making it up. Here goes!
From Tanith: The Wearer's Perspective
I love this snood. It's fun and different and really cute. I guess the only downside is that it doesn't have the versatility of a plain snood, but since I have a few others that are plain that doesn't bother me.
The bow is a bit tricky. It certainly doesn't just sit up like that by itself. I found that by holding the bow the way you want it to sit and sticking a bobby pin or two into the middle, you can get a very good result pretty easily.
As a wearer, I'd recommend this snood pattern if you are looking to add something a little different and special to your collection.
From Rhiannon: The Maker's Perspective
Last year as part of Snoodtember, Tanith asked me to review a number of vintage snood
crochet patterns which featured in magazines and newspapers freely
available through Trove. After I did so, I decided to try several and
blogged about them (http://parlourduck.blogspot. com.au/2016/11/vintage-snood- pattern-reviews-belated.html). I also made the fabulous-looking "Snood with Bow" but as that was a gift I didn't blog about it!
The pattern didn’t give tension/gauge information, but did
specify a No. 4 knitting cotton and a No 10 aluminium crochet hook. I chose
Sullivans Mercerised Knitting and Crochet 4 ply cotton because it closely matched
the description and as a bonus it came in a red which closely matched the lighter
weight crochet cotton I was using to make the accompanying gloves. Because the
final size of the snood didn’t have to be exact, I used my trusty Stratnoid 13,
a lovely vintage hook which suits my hand comfortably and is about 2.5m, even
though a no 10 should be closer to 3 or 3.25. I have learnt that I often work
with a looser tension than vintage patterns expect, so a smaller hook isn’t a
huge issue for me.
The instructions for
the crochet mesh are straightforward and as most of the snood consists of
repeating a pattern for many rows, it was easy to fall into a rhythm and the
body of the snood worked up quickly. The instructions to finish the edge
require a bit more care, as you need to pay attention to exactly which
edge you are working on, but there is nothing complicated about them. The bow
is once again easy to work, as after the initial set-up rows you are just
repeating the same pattern for 50 rows. By far the hardest part for me was
making the strip of mesh up into the bow shape, working out how to balance the
length of worked mesh into the bow loops and the hanging ends. I haven’t had
much experience with that tacked style of bow.
The final step was starching it all so the bow sat nicely. I decided to
make my own, heating water and corn-starch, and it was a bit strong. I spent a few days gently handling the bow and
snood, working them between my palms, to soften them up, rather than washing
and starting again, simply because it was a miserable rainy week and I wasn’t
sure it would dry
This was a nice pattern which worked up quickly, but the snood itself isn't particularly different from many patterns available. The impact comes from the bow, which could be added to any snood pattern which you already have and know works for your head.
For anyone making this up, folding a strip into a bow is easy once you have a bit of practise. I do this a lot with ribbon (and sometimes paper for wrapped presents). But it is a bit hard to explain, so I hope this photo might help. Fold the crocheted strip in this way, then sew it together in the centre. Once it is attached this way, you can gather it up the centre and attach to the snood.
I hope this is helpful to anyone who wants to try their hand at this snood pattern, or perhaps do as Rhiannon suggests, and add a bow to another snood pattern.
Now I just need that Southern Cross jumper!
Saturday, 9 September 2017
Snoods from other decades
Snoods really hit their stride in the 1940s, but that isn't the only decade in which they appeared. Since this week is "Era hopping" for Snoodtember, why don't we have a little look at some inspiration from other times?
A lot of references to snoods in the 1950s (in the Australian publications at least) turn to being about something that is more of a scarf or head wrap style. The one you see on the right above is interesting as it is in that scarf style, but appears to still be in a netted material. Plus it has pompoms.
For the women with short hair who miss out on snoods, the left image is a navy blue satin evening snood from Schiaparelli, with a jewelled clasp at the neck.
I love these 1960s snoods. The hair went big, and so did the snoods. I do love the mushroom shapes, but my favourite sixties hats are the fluffy fur ones, so I love that middle one! (Plus, it's another style you can wear with short hair.) Although, as the article says, all of them are tops.
A little more unusual, and so very 60s! That chenille version on the left is so perfectly suited to the era, while still really staying true to the 40s idea.
That issue also included two snood patterns, one knitted and one crocheted, which are really still in the classic 1940s style, although the second one is rather larger.
Hello 1970s! OK, apart from the make-up, not much has changed, right?
I can't call a haute couture photoshoot a real snood comeback, but I had to share this one anyway. Why not wear your snood with some GIANT FEATHERS. You know you want to.
I hope you've enjoyed this little trip through some less expected decades and looks from the snood world, and that maybe these images have provided some inspiration too!
![]() |
| Left: The Sun, 26 Nov 1950, Right: The West Australian, 4 Sep 1950 |
For the women with short hair who miss out on snoods, the left image is a navy blue satin evening snood from Schiaparelli, with a jewelled clasp at the neck.
![]() |
| The Australian Women's Weekly, 31 Mar 1965 |
I love these 1960s snoods. The hair went big, and so did the snoods. I do love the mushroom shapes, but my favourite sixties hats are the fluffy fur ones, so I love that middle one! (Plus, it's another style you can wear with short hair.) Although, as the article says, all of them are tops.
![]() |
| The Australian Women's Weekly, 31 Mar 1965 |
![]() |
| The Australian Women's Weekly, 31 Mar 1965 |
![]() |
| The Australian Women's Weekly, 17 May 1978 |
Hello 1970s! OK, apart from the make-up, not much has changed, right?
![]() |
| Vogue, 1 Oct 1994 |
I can't call a haute couture photoshoot a real snood comeback, but I had to share this one anyway. Why not wear your snood with some GIANT FEATHERS. You know you want to.
I hope you've enjoyed this little trip through some less expected decades and looks from the snood world, and that maybe these images have provided some inspiration too!
Saturday, 2 September 2017
Welcome to Snoodtember 2017
Somehow it's already that time of year again! Snoodtember: a time to celebrate all things snood, time to have fun with this vintage classic accessory and take a lot of heavily filtered snood-selfies.
As with last year, there are weekly themes, but I won't be doing individual posts on them here on the blog this time. As before, the themes are optional, feel free to share any snood looks at any time! They are just there if you are looking for some ideas.
Week 1 (Sept 3rd - 9th): Seasonal
Since
September marks a change of season, explore that in your snood style.
For those in the Southern hemisphere with me, celebrate the start of
spring, perhaps with flowers, butterflies and bees, or enjoy the last of
the cold weather by adding some wintery touches. If you are on the
other side of the planet, you might like a last summery hurrah or to
welcome autumn with some changing leaves and orange hues.
Week 2 (Sept 10th - 16th): Era hopping
Snoods
were big in the forties, but they enjoyed success in a range of eras.
Take some inspiration from the way they were worn in the 60s, the 80s,
or even way back in the Renaissance! Alternately, keep your snood the
same but try it with an outfit from a different era than your usual or
one that mixes a few.
Week 3 (Sept 17th - 23rd): Colours of the rainbow
Go bold and explore colour! You don't have to have a range of snood colours for this, but use your outfits and other accessories to give you more options. Try different colour combinations all at once or focus on one colour a day and make your week into a rainbow!
Week 4 (Sept 24-30): Inspired By
Imitation is the sincerest form of flattery. Find an image or idea that inspires you and make it your own. Maybe it's a vintage photo or fashion sketch, or a homage to one of your favourite movie stars. Or maybe one of your fellow Snoodtember participants created a really great look or had a great way of wearing their snood and you want to try it out. There's lots of great inspiration out there!
I hope you'll join me in celebrating snoods this month!
Saturday, 24 September 2016
Snoodtember weekly theme: With a Hat
If you see a modern girl dressed in vintage style wearing a snood, you'll probably see it by itself, adorned with hair flowers or a simple bow. Back in the 1940s, you might just as often, or perhaps more often, have seen it worn with a hat, or as part of a hat. I don't know what was seen most on the everyday woman, but based on the magazine images, snoods with hats were in the majority!
"The newest thing in millinery is the largest possible snood draped from the smallest possible hat" (Examiner, 2 Feb 1940)
Sometimes the snood would look pretty much the same as the ones we are used to - a knit or crochet covering for the hair - just with a hat worn on top as well.
But the hat-accompanying snoods would also stretch our understanding of what a snood really is. Sometimes the look of a snood was created with some net or veiling that simply fell over the back of the hair, without actually enclosing it. Sometimes the snood might be what is holding the hat to the head, as a more decorative alternative to a simple elastic. These snoods might go over the hair, but not enclose all of it, perhaps leaving curls out at the bottom.
Let's get some inspiration from the archives.
Irene Dunne is the star in question, and she's wearing a black and white outfit, with a black straw hat and a snood made of her dress material.
The article states that the snood help keep the tilted hat on firmly, as well as holding in the hair. Also, "The pill box, the tri-corn, the glengarry, the coachman hat and the sailor, all take kindly to the addition of a snood."
A bit of street-style photography from the forties, this straw hat with mesh snood was seen in the crowd at Wimbledon.
Two mesh snoods among these hat looks, making their appearance in the Autumn collection at David Jones.
Suggestions for touching up last year's pillbox hat include adding a mesh snood that sticks out "provocatively". This snood is covering most of the hair, but notice the curls at the side.
Again, the pretty curls are out at the side of the head, but the rest of the hair is inside the snood.
Here the snood is showing curls at the bottom, so while it would keep some hair in place, it is probably mostly serving to hold the hat in place. The hat, by the way, is in the shape of the ace of clubs, and I can't tell you just how fabulous I think that is.
This hat is described as having a snood, but as you can see, it looks more like a drape of veil giving a snood-like effect. Beautiful either way!
So, it's a bold look for modern times, but be brave and give it a try this week, the last week of Snoodtember. I think we can all agree the look is stunning!
"The newest thing in millinery is the largest possible snood draped from the smallest possible hat" (Examiner, 2 Feb 1940)
Sometimes the snood would look pretty much the same as the ones we are used to - a knit or crochet covering for the hair - just with a hat worn on top as well.
But the hat-accompanying snoods would also stretch our understanding of what a snood really is. Sometimes the look of a snood was created with some net or veiling that simply fell over the back of the hair, without actually enclosing it. Sometimes the snood might be what is holding the hat to the head, as a more decorative alternative to a simple elastic. These snoods might go over the hair, but not enclose all of it, perhaps leaving curls out at the bottom.
Let's get some inspiration from the archives.
![]() |
| From the Western Mail, 23 Jan 1941 |
Irene Dunne is the star in question, and she's wearing a black and white outfit, with a black straw hat and a snood made of her dress material.
![]() |
| From the Weekly Times, 10 Feb 1940 |
The article states that the snood help keep the tilted hat on firmly, as well as holding in the hair. Also, "The pill box, the tri-corn, the glengarry, the coachman hat and the sailor, all take kindly to the addition of a snood."
![]() |
| From the Sunday Mail, 7 Jul 1946 |
A bit of street-style photography from the forties, this straw hat with mesh snood was seen in the crowd at Wimbledon.
![]() |
| From The Sun, 11 Jan 1939 |
Two mesh snoods among these hat looks, making their appearance in the Autumn collection at David Jones.
![]() |
| From the Queensland Times, 27 Jan 1941 |
Suggestions for touching up last year's pillbox hat include adding a mesh snood that sticks out "provocatively". This snood is covering most of the hair, but notice the curls at the side.
![]() |
| From the Western Mail, 29 Feb 1940 |
Again, the pretty curls are out at the side of the head, but the rest of the hair is inside the snood.
![]() |
| From The Australian Women's Weekly, 4 May 1940 |
Here the snood is showing curls at the bottom, so while it would keep some hair in place, it is probably mostly serving to hold the hat in place. The hat, by the way, is in the shape of the ace of clubs, and I can't tell you just how fabulous I think that is.
![]() |
| From The Telegraph, 20 Jul 1940 |
This hat is described as having a snood, but as you can see, it looks more like a drape of veil giving a snood-like effect. Beautiful either way!
So, it's a bold look for modern times, but be brave and give it a try this week, the last week of Snoodtember. I think we can all agree the look is stunning!
Friday, 23 September 2016
Snood-along part two: Making your fabric snood
It's sewing time! If you haven't picked a fabric yet, read the recommendations in Part One first and also get some extra inspiration there.
This pinky-red velvet was my test snood, but I didn't take pictures as I went, so now I'm using a paisley patterned velvet/velveteen from an old skirt (it was already cut apart and damaged when I got it) for the tutorial photos.
First we need a pattern. The shape is a sort of half-oval with a base of 30 inches and a height of 18 inches. Mark out those lengths then join them with a curve by hand. Your pattern should look something like this. Honestly I've cut mine straight onto the fabric, but you may wish to draw it on paper first.
Now we begin by sewing the channel for the elastic. Fold the fabric over twice along the curved edge and pin in place. At the curviest sections, you will need to ease the fabric as you go. It will end up gathered, so don't worry too much about the neatness.
Sew close to the inside edge of the fold.
Cut your length of elastic (about 10-15 inches) and sew one end by hand to one end of your elastic channel. Attach a safety pin to the other end of the elastic. Feed the safety pin through the channel until it emerges at the other end.
Pull on the elastic to gather up the fabric. I pretty much gathered it as much as I could, but judge for yourself if you want it a little looser. Once you are happy, sew the elastic in place at the end of the channel and cut off the excess.
Now we will finish the front edge, the straight edge. Depending on your fabric, you could do this by machine or by hand. Fold the edge into a double hem again and sew.
To sew by hand, take a long stitch through the hem followed by a short stitch through the single layer, trying not to let the stitch show on the outside.
The front edge is too long as it is, so it needs to be looped under. It helps if you can pin the snood onto a mannequin head to do this step. Fold about 4 inches under at each end. Pin into place, and sew with a few hand stitches.
And that is that! Your snood is complete. I do like it as is, but it would look great trimmed with a bow or worn with a hat (which is next week's theme and is going to be so much fun!).
This particular fabric gives it more of a sixties or seventies look, doesn't it?
It's a pretty fabulous fabric. I'm just going to stare at this for a while, then I might make one out of a chiffon-type fabric and see how it goes.
Good luck making and I'd love to see what you create!
This pinky-red velvet was my test snood, but I didn't take pictures as I went, so now I'm using a paisley patterned velvet/velveteen from an old skirt (it was already cut apart and damaged when I got it) for the tutorial photos.
First we need a pattern. The shape is a sort of half-oval with a base of 30 inches and a height of 18 inches. Mark out those lengths then join them with a curve by hand. Your pattern should look something like this. Honestly I've cut mine straight onto the fabric, but you may wish to draw it on paper first.
Now we begin by sewing the channel for the elastic. Fold the fabric over twice along the curved edge and pin in place. At the curviest sections, you will need to ease the fabric as you go. It will end up gathered, so don't worry too much about the neatness.
Sew close to the inside edge of the fold.
Cut your length of elastic (about 10-15 inches) and sew one end by hand to one end of your elastic channel. Attach a safety pin to the other end of the elastic. Feed the safety pin through the channel until it emerges at the other end.
Pull on the elastic to gather up the fabric. I pretty much gathered it as much as I could, but judge for yourself if you want it a little looser. Once you are happy, sew the elastic in place at the end of the channel and cut off the excess.
Now we will finish the front edge, the straight edge. Depending on your fabric, you could do this by machine or by hand. Fold the edge into a double hem again and sew.
To sew by hand, take a long stitch through the hem followed by a short stitch through the single layer, trying not to let the stitch show on the outside.
The front edge is too long as it is, so it needs to be looped under. It helps if you can pin the snood onto a mannequin head to do this step. Fold about 4 inches under at each end. Pin into place, and sew with a few hand stitches.
And that is that! Your snood is complete. I do like it as is, but it would look great trimmed with a bow or worn with a hat (which is next week's theme and is going to be so much fun!).
This particular fabric gives it more of a sixties or seventies look, doesn't it?
It's a pretty fabulous fabric. I'm just going to stare at this for a while, then I might make one out of a chiffon-type fabric and see how it goes.
Good luck making and I'd love to see what you create!
Saturday, 17 September 2016
Snoodtember weekly theme: novelty
Unfortunately, I do not have a lot of pretty inspiration images for you today! Although the 1940s were keen on novelty fashion items, with quirky prints on dresses, embroidery and appliqué, wacky knitting and crochet patterns, wild hats by the likes of Bes-Ben, and of course jewellery on some surprising themes, I haven't seen much in the way of novelty snoods. The only one I'd call novelty is this pompom covered snood (thanks to @misssabrinafairchild on instagram for drawing my attention to it).
That's ok, we're going to start the trend ourselves. Here are some ideas:
While adding a flower or bow to your hair, why not add a novelty brooch? Nestle a cute animal in amongst the petals and make your novelty statement that way. All kinds of jewellery bits and bobs could be useful. Don't forget your millinery fruit - always a good option too. And if you are wearing a snood at Christmas time - go nuts! You can take just about any ornament off the tree and make it work.
The only vintage reference I do have is this, from The Age, 9 Aug 1944:
"Ornamental daggers, clips and gay brooches can be used in any further number of experiments."
Challenge set: ornamental daggers, people!
If you are doing the snood-along, you could look for a novelty fabric to use. I have something I've been saving just for this occasion and I'm looking forward to using. Or, if you have a novelty-print scarf, tie it into a scarf snood.
Just as I did with my year of whimsies, I'm planning to bust out the felt and scissors and get some cute animals on my snoods! Cut some felt shapes and quickly stitch them on to your snood. If you aren't feeling that crafty, look out for little novelty buttons that could do a similar job, and don't forget the pompoms! Maybe a Halloween snood with little pumpkins and orange flowers at the front? Or a baking snood with little cookies? Now I'm getting excited!!
What novelty ideas do you have for this week? I admit this is going to be my favourite. I've been missing my novelty since the whimsies ended!
That's ok, we're going to start the trend ourselves. Here are some ideas:
Novelty Trims
While adding a flower or bow to your hair, why not add a novelty brooch? Nestle a cute animal in amongst the petals and make your novelty statement that way. All kinds of jewellery bits and bobs could be useful. Don't forget your millinery fruit - always a good option too. And if you are wearing a snood at Christmas time - go nuts! You can take just about any ornament off the tree and make it work.
The only vintage reference I do have is this, from The Age, 9 Aug 1944:
"Ornamental daggers, clips and gay brooches can be used in any further number of experiments."
Challenge set: ornamental daggers, people!
Novelty Fabric/Scarves
If you are doing the snood-along, you could look for a novelty fabric to use. I have something I've been saving just for this occasion and I'm looking forward to using. Or, if you have a novelty-print scarf, tie it into a scarf snood.
Decorations on the Snood
Just as I did with my year of whimsies, I'm planning to bust out the felt and scissors and get some cute animals on my snoods! Cut some felt shapes and quickly stitch them on to your snood. If you aren't feeling that crafty, look out for little novelty buttons that could do a similar job, and don't forget the pompoms! Maybe a Halloween snood with little pumpkins and orange flowers at the front? Or a baking snood with little cookies? Now I'm getting excited!!
What novelty ideas do you have for this week? I admit this is going to be my favourite. I've been missing my novelty since the whimsies ended!
Tuesday, 13 September 2016
Snood-along part one: Fabrics and inspiration
Are you ready for the snood-along? Join me in making a 1940s style fabric snood. It's really quick and easy!
This is the snood we'll be making. Today we're going to talk about fabrics, so that you can find something suitable, and look at some period inspiration images too. As you can see, I've made this from velvet, but there are lots of fabric options.
Your fabric snood is all about drape and gathering. So look for a nice drape in your fabric. It can be light and flowing, like chiffon, or heavier, like a jersey or velvet. You will obviously make your choice based on the season and the outfits you plan to pair it with, and the occasions you will wear it to. If you have any clothing you have made yourself, making a snood out of the leftover fabric was common and popular in the 1940s.
Some vintage examples that I found mentioned include a chiffon snood to match a swimsuit, corduroy to match a winter suit of the same, fine silk for 'afternoon wear' in summer, and wool jersey with a chenille pillbox and winter dress.
You will need a 30 inch by 18 inch rectangle, but a little less in either dimension is fine, it will only alter the fullness of the snood (and it is pretty darn full). You will also need matching thread, and about 10-15 inches of elastic (preferably round, but any fairly thin elastic should be fine). There ends up being only about 8 inches of elastic in the snood, but having more makes threading it in a lot easier, and you can then adjust it to a point that you like.
I've based my fabric snoods, and the patterns and instructions I'll be sharing with you, on the instructions from How to Make and Trim Your Own Hats by Vee Powell. I have changed it since then, since I didn't find it to be quite right for me. It was too voluminous, attached to a hat foundation, and didn't gather enough to actually keep my hair in, as well as more-or-less requiring the trim they suggested.
My version is closer to being a fabric version of a crocheted snood, designed to be worn by itself, to hold your hair in, and to be trimmed by you however you want.
A lot of the fabric snoods I found in vintage images were worn with hats, and I've included some of those here, but I tried to focus on those where the snood is the main player.
The text for the bottom left image above describes the snood as "capacious as a knitting bag", but it's the top left that is most like my snood in the end. I might have to add that bow!
These two images look to me like they might be scarves tied as snoods although the one below I'm not as sure of, especially because of the bow.
For instructions on how to tie a scarf as a snood, see Casey's tutorial.
I fell in love with this snood the moment I saw it, and her whole outfit is fabulous. The snood interests me as it isn't completely closed over the head, but almost so. I wish I could see more angles!
One of the noticeable features of some fabric snoods is that they have gathered details at the back, like this Lilly Dache turban snood. Rather than letting the fabric keep it's fullness around the back of the head, it is gathered and tucked to give more shape. Something to try, perhaps.
While I can't see exactly what is happening with this snood, this is the matching corduroy number I mentioned above. The photo appearing in a few country newspapers but the quality was pretty similar. It looks glam though!
Not so glam, but still too cute to leave out. The more functional factory girl snood. Also, what the heck is a lunch-box inspection?
Next week we'll go through the making process, so find your fabrics and get ready! And let me know what you're planning!
This is the snood we'll be making. Today we're going to talk about fabrics, so that you can find something suitable, and look at some period inspiration images too. As you can see, I've made this from velvet, but there are lots of fabric options.
Fabrics
Your fabric snood is all about drape and gathering. So look for a nice drape in your fabric. It can be light and flowing, like chiffon, or heavier, like a jersey or velvet. You will obviously make your choice based on the season and the outfits you plan to pair it with, and the occasions you will wear it to. If you have any clothing you have made yourself, making a snood out of the leftover fabric was common and popular in the 1940s.
Some vintage examples that I found mentioned include a chiffon snood to match a swimsuit, corduroy to match a winter suit of the same, fine silk for 'afternoon wear' in summer, and wool jersey with a chenille pillbox and winter dress.
You will need a 30 inch by 18 inch rectangle, but a little less in either dimension is fine, it will only alter the fullness of the snood (and it is pretty darn full). You will also need matching thread, and about 10-15 inches of elastic (preferably round, but any fairly thin elastic should be fine). There ends up being only about 8 inches of elastic in the snood, but having more makes threading it in a lot easier, and you can then adjust it to a point that you like.
I've based my fabric snoods, and the patterns and instructions I'll be sharing with you, on the instructions from How to Make and Trim Your Own Hats by Vee Powell. I have changed it since then, since I didn't find it to be quite right for me. It was too voluminous, attached to a hat foundation, and didn't gather enough to actually keep my hair in, as well as more-or-less requiring the trim they suggested.
My version is closer to being a fabric version of a crocheted snood, designed to be worn by itself, to hold your hair in, and to be trimmed by you however you want.
Inspiration
A lot of the fabric snoods I found in vintage images were worn with hats, and I've included some of those here, but I tried to focus on those where the snood is the main player.
![]() |
| From Vogue Nov 1 1939 |
The text for the bottom left image above describes the snood as "capacious as a knitting bag", but it's the top left that is most like my snood in the end. I might have to add that bow!
![]() |
| From the Library of Congress (Flickr) |
![]() |
| From the Library of Congress (Flickr) |
For instructions on how to tie a scarf as a snood, see Casey's tutorial.
![]() |
| I couldn't discover the actual origin of this photo, from Flickr here, found via Chronically Vintage |
I fell in love with this snood the moment I saw it, and her whole outfit is fabulous. The snood interests me as it isn't completely closed over the head, but almost so. I wish I could see more angles!
![]() |
| From Vogue Sep 1 1941 |
![]() |
| From the Toodyay Herald 11 Oct 1946 |
While I can't see exactly what is happening with this snood, this is the matching corduroy number I mentioned above. The photo appearing in a few country newspapers but the quality was pretty similar. It looks glam though!
![]() |
| From a Pond's advertisement in Vogue, Mar 1 1943 |
Not so glam, but still too cute to leave out. The more functional factory girl snood. Also, what the heck is a lunch-box inspection?
Next week we'll go through the making process, so find your fabrics and get ready! And let me know what you're planning!
Saturday, 10 September 2016
Snoodtember weekly theme: Bows & Bling
I was going to have these as separate themes but there weren't enough weeks in September! Since one of the pieces I am keen to create had both, together they went. I hope you'll join me for a week of playing with pretty bows and sparkly bling!
Often a crocheted snood will have a ribbon to tie it up, or in as a decorative addition while elastic holds the snood, so a ribbon bow on the top of the head is a classic choice. Let's explore some more ideas from the archives.
Bows at the sides, near the ears, are another easy choice. Just tie up your ribbon into a bow and slide a bobby pin over it and into place, or tie it onto the snood itself. I like the ribbon plait across the top too.
This one, from the movie, Orchestra Wives, really inspired me. Honestly, on my small computer screen you can hardly even see the hair net, but on a large screen TV it looked like a fine net or veil half snood and it looked like it had sparkly bits in it too. As well as an oversized velvet bow, which can never be the wrong choice, I'm sure.
"Scattered Bows. — It's so effective, this simple trick of dotting tiny bows about your snood. You need only 1/4 yd. of 3/4 in. ribbon to make each bow; 2 yd. is enough to cover an ordinary snood. Simply divide your ribbon into 9 in lengths, knot each into a tiny bow, and stitch each bow to a knot in the mesh at spaced intervals. It's a decorative idea that can be done equally effectively with big pearls, with artificial jewels, with different, colored ribbons or colored beads."
Definitely one of the easiest options to try, and one you can easily attempt on your existing snoods and remove if you don't like it or want a change later.
Another suggestion, from The Age, 09 Aug 1944: "...pert little bows of contrasting colored ribbon across the top of the head." No image, sadly.
One of the ideas I'll look at more when we get to
snoods with hats, it that sometimes it is not a hair-encompassing snood,
but just the look of a snood, or enough to act as a bandeau to hold the
hat on. In this illustration, that seems to be the case, with curls of
hair below the snood, and the big bow in between.
Similarly, this is referred to as a snood, although
it seems to be draping over the hair. In any case, the caption says that
it is knotted in tiny brown taffeta bows (the hat and net are also
brown).
It's time for some sequins, rhinestones, shiny beads, and sparkly accessories!
As suggested by The Age, 1 Feb 1941:
This snood (and the matching gloves) is described as crocheted in white wool, sparkling with pearls, gold sequins and topaz coloured stones.
A little mermaid-esque look from The Age, 09 Aug 1944:
What do you think? Are any of these ideas something you would try?
Bows
Often a crocheted snood will have a ribbon to tie it up, or in as a decorative addition while elastic holds the snood, so a ribbon bow on the top of the head is a classic choice. Let's explore some more ideas from the archives.
![]() |
| From The Argus 3 Oct 1944 |
Bows at the sides, near the ears, are another easy choice. Just tie up your ribbon into a bow and slide a bobby pin over it and into place, or tie it onto the snood itself. I like the ribbon plait across the top too.
This one, from the movie, Orchestra Wives, really inspired me. Honestly, on my small computer screen you can hardly even see the hair net, but on a large screen TV it looked like a fine net or veil half snood and it looked like it had sparkly bits in it too. As well as an oversized velvet bow, which can never be the wrong choice, I'm sure.
![]() |
| From the Weekly Times of Melbourne, 7 Mar 1945 |
"Scattered Bows. — It's so effective, this simple trick of dotting tiny bows about your snood. You need only 1/4 yd. of 3/4 in. ribbon to make each bow; 2 yd. is enough to cover an ordinary snood. Simply divide your ribbon into 9 in lengths, knot each into a tiny bow, and stitch each bow to a knot in the mesh at spaced intervals. It's a decorative idea that can be done equally effectively with big pearls, with artificial jewels, with different, colored ribbons or colored beads."
Definitely one of the easiest options to try, and one you can easily attempt on your existing snoods and remove if you don't like it or want a change later.
Another suggestion, from The Age, 09 Aug 1944: "...pert little bows of contrasting colored ribbon across the top of the head." No image, sadly.
![]() |
| From The Argus, 6 Apr 1940 |
![]() |
| From The Telegraph of Brisbane, 20 Jul 1940 |
Bling
It's time for some sequins, rhinestones, shiny beads, and sparkly accessories!
As suggested by The Age, 1 Feb 1941:
"Another
idea if your gown is black and diaphanous, wear a belt of gleaming
black or midnight-blue sequins, and carefully sew matching sequins
lavishly on the mesh of the black silk snood. You may think this rather a lot of trouble, but the effect is well worth it, and various ideas on the same lines may be adopted most successfully."
![]() |
| From the Weekly Times of Melbourne, 8 May 1946 |
A little mermaid-esque look from The Age, 09 Aug 1944:
"An exquisite custom for finishing a fascinating and gay model is the threading of pearls through the sequin snood.
A pearl-studded comb - if you are fortunate enough to have such a thing
- has infinite possibilities on a black or wine-coloured snood. Wear it
placed at the stem of an artificial flower."
Subscribe to:
Posts (Atom)
©
Tanith Rowan | All rights reserved.


