Thursday, 1 March 2018

Tutorial: Adding felt appliqué birds to your Grevillea Beret

Today I'm sharing the pattern and instructions for adding some birds to your Grevillea Beret using felt. As you know, I love felt, I love berets, and I love birds on hats, (I really love birds on hats.) so it's about time to combine all three!


You will need:

Your Grevillea Beret pattern and all the usual material and tool requirements for it*
Thin felt (1mm thickness is good, and I prefer 100% wool)
Embroidery floss to match your felt
Appliqué birds pattern, printed out

*Look obviously you could use a different pattern or appliqué onto a beret you already own, but let's not dwell on that idea too long.


Cutting out your birds:

I printed my pattern on to regular paper, cut the pattern pieces out, traced around them with an air-disappearing pen and cut the pieces from the felt. I found this to be OK, but it did require some trimming afterwards to smooth out some bits. I think a better method would be using freezer paper, although I know it's not as easy to find in Australia.


Note: the birds have very narrow sections on the tails that pull apart easily. Handle the pieces very carefully. You may even want to consider cutting them wider at first and trimming just before you sew.

Sewing the birds on:

As you are working through construction of your beret, you want to add the appliqué at the point where your crown is complete, but before you add lining (if you aren't adding a lining you could add an appliqué at any point).

Put your beret crown on a mannequin (or your own head, but that's a bit trickier), folding under the seam allowance. Pin your felt shapes in place and rearrange them until you are happy with the layout.

Sew your felt shapes in place one by one using two strands of embroidery floss. I used a whipstitch, following this video tutorial by Wendi Gratz. Others suggested blanket stitch, so I would recommend looking at both and deciding which you prefer. I liked the simple option and it seems to have worked well.


Note: that advice above about the tails? I was not so good at following it myself. I lost two tail ends, so as I stitched the pieces on I had to do a little bit of extra embroidery to replace them. It looks OK from a distance and it's a good way to recover the situation, but I'd recommend trying to avoid the problem instead!

Once your birds are on, proceed to add the lining and the headband and finish off your beret.


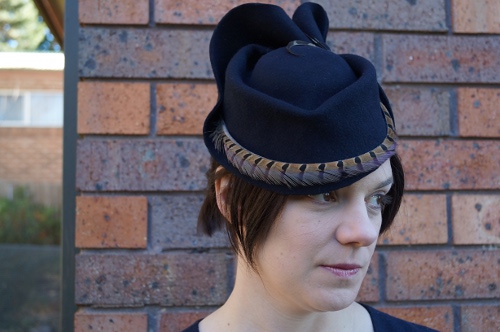
My husband wasn't sure about the black and white, and I think in hindsight I agree, but it does make for good contrast images. I'd like maybe navy with pale grey birds. What colours can you see it in?
SHARE:

Thursday, 13 April 2017

1940s Felt Turban collaboration with Rockagirl

I've been lucky to collaborate with some amazing people in the last few years, and the images from these collaborations always take my breath away.


Last year I worked with Polish pin-up model Maja, known as Rockagirl. She was interested in a 40s-inspired shoot, in collaboration with some other brands, and was taken by my previous wool turban.


I love how this turban looks in the burgundy colour, and with these outfits and the beautiful Rockagirl, it is simply stunning.


Collaborations can be a lot of stress, especially with my unpredictable work schedule as a work-from-home-mum, but I always end up feeling very proud of my work when it is displayed to such advantage.


I don't actually know anything about the location for this photoshoot, but the lines in he background complement the folds and grooves in the hat so beautifully!


When I return from maternity leave, it may be some time before I get back to doing much in the way of collaborations, since my time will be so much more limited, but I know there will be more eventually, because results like this can't be ignored!


This turban is currently listed in my Etsy shop, but remember that I'll be closing that for maternity leave very soon - in about a week, in fact.

This will be my last pre-maternity blog post too, so I'll see you when I'm a mother of two! Yikes.

Model: Rockagirl (FB: www.facebook.com/rockagirl, IG: @rockagirl)
Photographer: Joanna Mucha (FB: www.facebook.com/darcoalt, IG: jeanne_darco)
SHARE:

Thursday, 1 December 2016

Big events and business plans

Fedoras are one of those styles that have dipped their toes into both men's and women's fashion. They started as a women's hat, became more of a male style, and now sit fairly comfortably in both camps. Likewise the colour blue has a longer history of being associated with little girls than little boys. Probably, however, a blue fedora is more likely to suggest masculine vibes to most people, and it does so to me.

So what does a very small blue fedora suggest to you?


If you thought "Tanith's having a baby boy!", you are correct.


We are back in pregnancy mode. Once again, I have survived the awful first trimester of nausea and exhaustion, and entered the second trimester of not fitting into your clothes and less exhaustion.

Having a child and being her primary carer has resulted in a lot of soul searching regarding my desire for my own business. There were times when it just seemed impossible, and others when I knew I needed it so much. I know that having two children in my care is going to be even harder and I don't yet know what that means for my business. I will obviously be taking a break, but what kind of pace I keep up after that remains to be seen. I have ideas and plans to make it work, but in the end there could have to be a lot of pauses that I don't plan for. I do intend to keep it up in the long run in some form, even if it takes years to really get back into the swing.


Regarding the fedora, I don't have a small fedora block, so I blocked it with a regular crown on my toddler-sized block, then hand-shaped the pinched fedora look into place. I'm not sure how well it will last but I'm pretty pleased with the look. Plus, it's just adorable, right?

Oh and the new addition, whose social media nickname has already been chosen at T-Rex, is due in early May. Teacup has been told she is getting a little brother, and says that there is "a baby growing in there" but how much of this she really grasps we shall have to wait and find out!
SHARE:

Wednesday, 2 November 2016

Blocking without a hat block

A standard dome hat block is one of the most useful tools I can imagine in the millinery world. As much as I love special shapes of block, the dome is unbeatable for versatility and usefulness. But if you are just starting out in millinery or just having a bit of fun with it, even one block is a big investment.

There are hat-making methods other than blocking, like making flat pattern hats from fabric or on a buckram foundation, but blocking really is fabulous. It is fun and creative and opens up all kinds of possibilities.

It is true that if you want to block a hat with a nice round crown that fits closely to your head, like a cloche for example, a hat block is going to be pretty necessary. But there are many other shapes of hats out there, especially when it comes to tilt hats.

I do believe it would be easier to learn how to block straw, felt, sinamay or buckram on a proper hat block first, then start to experiment, but it is not at all necessary. And if you learned on someone else's block, in a class for example, then didn't want to buy your own right away, you should consider some other options.

Let me share with you some examples of my own where I've used alternatives to proper hat blocks.

Found objects


First, random objects totally unrelated to millinery. Once you start looking at objects as possible blocks, it will be hard to stop.

Make sure you consider whether the material of the object can take the pressure of blocking, and how you will hold your blocking material in place. Can you pin into the object? Tie string or rubber bands around it? Blocking felt in particular can take a lot of force, so fragility is a consideration. Also how susceptible might it be to steam or moisture, and how well can you cover it (usually with plastic wrap) to protect it?


I did block this felt on a glass vase, it's true. In hindsight I am not sure I would try that again. I used string to hold the rings in place around the bumps of the vase, and everything turned out alright. In my defence, it is a very sturdy vase.


This one was, I believe, a flower pot. But I'm not sure. It could have been a cookie tin. Much sturdier than glass, anyway. Since I couldn't use pins here either, rubber bands held the shape in place.


Not that you can see much of the shape here under the fluff, but the foundation for this hat was blocked on a large wooden bowl. I was able to use pins, which is good because the size might have made elastic more tricky to use. I always keep an eye out in op shops for wooden serving dishes and other bits and pieces. I have a lovely little pineapple blocked and waiting to be finished!

Photograph courtesy of @anneliesvanoverbeek

For this reproduction of a hat from Funny Face, the crown was blocked on a shape I made out of cardboard. I originally had the cardboard over a flower pot for added strength, but as I worked and changed the size, it became a cardboard-only block. Since the straw is a very good quality and blocks easily, the strength was still enough.


The tilt hat in my Nora Finds collaboration collection, was blocked on an improvised combination of two small wooden objects. I think one of them was the turned wooden lid of a glass jar, and one was the base of some kind of stand. I placed them together the way I wanted and wrapped them up tight in aluminium foil. With the freehand swirling on top, the exact shape didn't matter too much, but it gave me the right base I was trying to achieve.

Home-made hat blocks


I was lucky enough at one point to have some round hat blocks turned for me on a lathe, but you don't need access to those skills or tools to create a hat block. If you do have some woodworking tools available, simple cut-out shapes using a band saw or similar are very easy. I made my round and heart-shaped pillbox blocks using a band saw and some scrap wood.


Pillbox shapes are a great one to make yourself, and such a useful block to have as well. You can achieve the same result (at least with fabric covered hats) using a flat pattern, but this is quicker, as well as allowing you to work with felt too.


Both styles of pillbox have been used many times by me!


There are also options for carving blocks out of foam (I have done a class on this but haven't tried it since and I know it has to be the right type of foam) and I'm sure many more possibilities. Not all of these are going to last as long, and possibly aren't ideal choices for a beginner anyway!

Augmented hat blocks


So technically this isn't without a block, but I have also heard beginner milliner's with only a dome block complaining of needing more shapes and more options. I can't fault anyone for coveting more blocks, but there is so much more you can do with the ones you have!


I added a small sweets tin to the top of a dome to create this felt hat. I covered the hat block, taped on the tin, and covered both together, then blocked. Easy peasy!


The block for this cone hat (made for the lovely Kate at Retro Rover) was technically built from cardboard, but I did use a sloped brim block beneath it to add strength. I'm not sure if that was necessary, so this could potentially be one you could do from scratch. Keep in mind, though, that the right materials are key. Stretching a normal capeline to this shape may have been a nightmare, but I got advice from my supplier and used a buntal mat instead, which has a less rounded shape. It was perfect and a dream to work with.

If you've been on the fence about trying blocking, or putting off getting back into it because of the cost, consider seeing what else you have around the house, or can find cheaply, that could make a nice little hat shape.

Did any of these examples surprise you? I like to think they hide their secrets well!
SHARE:

Tuesday, 26 July 2016

1920s style with felt, fabric flowers and arrows

There's so much to love about 1920s hats, and many fun styles and materials to explore, but blocked felt cloches are a favourite of mine! There's something extra special about this one though. Any guesses?


Well, there are the arrows. They are pretty fabulous. Not as neat as I wanted them, naturally, but a really lovely feature. The whole hat is a close-ish copy of one from a 1920s catalogue, that I fell for as soon as I saw those arrows! But there's more that's new and different.


This is the first hat I've blocked on my 19 inch hat block - that's toddler size! I'm really excited to work on some hats for young kids. Naturally it's going to be nice to be able to make lovely things for my own daughter, but I'm also just enjoying working on a smaller scale and seeing the way it influences me.


Although I imagine I will make some cutesy, clearly-just-for-kids designs as well, I really want to create hats with classy vintage elegance that adults would be happy to wear too. I want to stay true to my taste, and see these hats as just another opportunity to explore the mountain of vintage inspiration bubbling up around me.

Yet I think as I made it, I found myself happy to make some decisions about trim that I might not have done on an adult hat. I don't mind this cute little fabric flower, but I do feel it has a "little girl" quality to it.


The arrows save it, I think, keeping it different and interesting. Expect to see more 1920s influences in toddler size, because I think cloches are a pretty but practical option for small people, and there are so many lovely trims and shapes to try out.

What other vintage styles do you think would be fun for toddlers?
SHARE:

Tuesday, 28 June 2016

Felt, faux fur, and more felt

Over the years I have made quite a few hats for my family and friends, and my mother has the biggest collection. So I didn't take many with me on my recent holiday, but instead planned to borrow some of those! My favourite was a small black felt hat with felt feathers and a snow leopard fur trim. I enjoyed wearing it so much, I decided to try some similar styles again.


I would be wearing this hat right now if I hadn't accidentally made it a bit too small for me! Instead it has gone, along with the rest of the hats in this post, into the Blackheath Hub with the berets for my first restock of winter.


I tried again with red and black, but I don't love the black faux fur on me. I guess I'll just have to make another one for myself!


Something that is so lovely about vintage hats is how different they look from different angles. This is particularly noticeable in those that sit on the back of the head, as these do, and create a frame around the face, with hidden details at the back. In this case, none of the red is visible, and it creates a nice bright surprise as you turn.


This next one I have mixed feelings about. I was going for a sort of heart-shaped halo effect, but I think I've arrived at fluffy tricorne instead. What do you think?


While those experiments had their ups and downs, it is hard to go wrong with a classic cloche. There is so much inspiration to draw on, but a swept back brim and velvet ribbon is hard to beat. And the dove grey vintage wool felt was lovely to work with and is such a subtle and classy colour.


This next was a design challenge, since the orange felt hood already had a bit cut out of the bottom (to make the visor on Nicole's 1960's rainbow helmet hat) and I don't work with orange very much either. So it had to make a small hat, leaning towards the 1930s in inspiration, with bow details I saw in a late 20s illustration. This type of hat often doesn't look like much on a mannequin, but is really flattering when worn. It might be the hair that makes all the difference.


Hopefully I'll manage to borrow them back from the shop and do a photoshoot so you can see them looking their best. Actually, I hope they sell out before I get that chance, but the photoshoot would be a nice option too. Although these hats are in the Hub now, non-locals feel free to contact me to ask about prices or about having something similar made.

I know many of you are in the sweltering heat of summer and may not enjoy even looking at wool, but try to imagine yourself in the misty cool of a mountains morning. Here, this should help:


Now, which one would you choose?
SHARE:

Tuesday, 8 December 2015

"Squirrel and Oak" Whimsy Design for December

Back in August, when I made the Scottie Dog whimsy, I asked for suggestions of other animals that would be cute on the veil of a design. Kate-Em suggested squirrels, paired with acorns, and I just loved the idea. I had been contemplating acorns on a whimsy for a while, and squirrels were the perfect complement as well as being an animal I love.


There are just a few squirrels running around the bottom of the veil, and one sitting at the top near the cluster of leaves and acorns.


My acorns were inspired by some amazing ones my sister made in an embroidery class. I was going to show you a picture of this inspiration, except that it would look like one of those "Saw it on Pinterest. Nailed it." memes and my pride is too sensitive. Still, I think my method was likely quicker, and it was fun to make. Anything that involves blocking felt over beads has got to be good. It felt like I was making the world's tiniest hats.


 It has ended up very autumnal, which I like, even it is currently Autumn in zero places in the world.


My lovely friend Ruanne, who you have seen model for me many times in the past, came up to the mountains with her family for a picnic in the park combined with a modelling session. I'm sure I've said it before, but I have the best friends!


Now I've done something tricky with this whimsy, which I've been planning to do for a while, but I hadn't quite worked out how to make it work. While whimsies are fun and very glamorous, they aren't necessarily something for everyday. So I made this one a bit more versatile.


Ta-da! The top part is a clip that can be removed and worn separately, for when a veil is just too much. Or you aren't in the mood for squirrels? Is that possible?


We also shot some other pieces, including the Christmas mistletoe whimsy, which I had only briefly shown you along with the Mistletoe Brooch tutorial.


It matches so beautifully with this blouse, which Ruanne made herself (from the Sencha by Collette Patterns, I believe).


Working out what type of hat wearer she is. We decided on "The Sophisticated Young Married or Businesswoman".


All of which brings us to the conclusion of the Bring Back the Whimsy series!

Bumblebees, Whimsy Tutorial, Choc Chip, Autumn Leaves, Leopard Print is a Neutral, Strawberry Blossoms, Ladybugs, Scottie, Bridal Whimsy, Candy Corn, Mistletoe, Squirrel and Oak.

Looking at them all together makes me feel pretty pleased with myself! I had such a great time exploring fun novelty themes, trying out new trim ideas and techniques, getting reacquainted with fimo, cutting shapes out of felt, working out how to make bees, and playing with veiling. I'm looking forward to bringing some of these themes and techniques into future hats and hair accessories too.

Thank you all for joining me on my year of whimsies. I hope you had fun and maybe even made yourself a whimsy following the tutorial.

Do you have a favourite from the series? I would have a hard time picking one myself!
SHARE:

Wednesday, 11 November 2015

Christmas Felt Mistletoe Brooch (or Hat Pin) Tutorial

When making my mistletoe whimsy, I was really enjoying playing with felt mistletoe, so I decided to also make a brooch version that could also be worn as seasonal trim on a hat.
Mistletoe Brooch or hat Pin Tutorial by Tanith Rowan

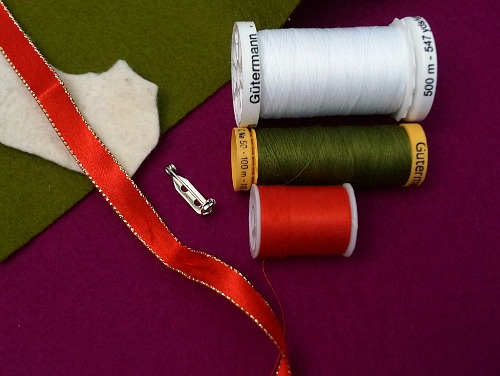
So let's get into it. You will need:

  • Green felt, approx. 10m by 10cm, can be in smaller scraps (I used 100% wool, 1mm thick)
  • White felt, a small scrap of a few square cm (I used some hand-felted wool from a friend, about 1-2mm thick but varied)
  • Red ribbon, approx. 15cm long (mine is gold-edged, 1cm wide, some kind of cheap craft ribbon from my stash)
  • Matching threads
  • Needle
  • Brooch clasp
  • Sharp scissors

Skills required

  • Hand stitching. You don't need any particular "stitch", you are just going back and forth through the materials to hold them in place, but you need to be able to thread a needle and tie a knot in the end and so on. (Having said all that, you can just use glue if you like!
  • Um...that's it!
Mistletoe Brooch or hat Pin Tutorial by Tanith Rowan

(Let me explain right here about my background colour. I wanted a solid background but not white, so that the white felt would show up. I used this fuchsia pink felt, but its colour showed up totally differently in different photos! Oops!)

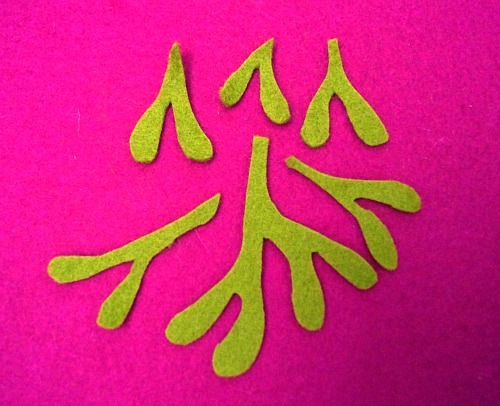
Cut out your mistletoe leaves. Here is a picture of mine. I cut freehand based on looking up images of mistletoe. I had to make sure I searched for real mistletoe, since a lot of results were clip art and illustrations, and a lot were also actually holly!

Mistletoe Brooch or hat Pin Tutorial by Tanith Rowan

But if you aren't confident at that, fear not! I turned mine into a pattern for you. Literally. I turned that image into a pattern rather than drawing one. I'm not sure if that's lazy or efficient. Print this out at approximately one quarter of an A4 page. Cut each shape out. I recommend tracing around with an erasable pen as the easiest way, then cutting out. This also allows you to get an efficient layout on your felt.

Mistletoe Brooch or hat Pin Tutorial by Tanith Rowan

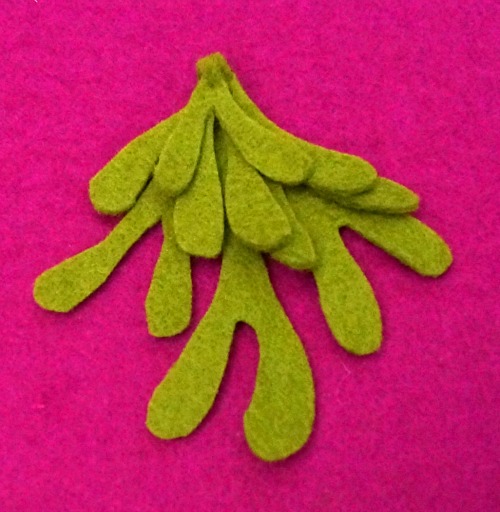
Thread your needle with green thread and knot the end.

That big piece is your base. Layer the others on top and sew them on, using a couple of stitches through the top of each one. Add the bigger pieces first, then the smaller ones on top.

Mistletoe Brooch or hat Pin Tutorial by Tanith Rowan

Cut out 8 small circles from the white felt. If they don't look round enough, rub them around between your fingers a bit as well. Place them on your mistletoe in pairs, with each pair located at the top of a pair of leaves. Thread your needle with white thread and knot the end.

Mistletoe Brooch or hat Pin Tutorial by Tanith Rowan

Stitch the berries on using the white thread and a stitch or two per berry. Start and finish the thread again for each pair so you don't have a long stitch between them at the back.

Take your ribbon and cut into a longer and shorter length (about 10cm and 5cm). Cut the longer piece on an angle at each end. Thread your needle with red thread and knot the end.

Mistletoe Brooch or hat Pin Tutorial by Tanith Rowan

Fold the longer piece into two loops and two ends, the loops and ends of the bow.


Stitch these folds in place with a few stitches.

Take the shorter piece and wrap it around the centre of your bow, and stitch that in place at the back of the bow.

Stitch the bow to the top of your bunch of mistletoe.

Mistletoe Brooch or hat Pin Tutorial by Tanith Rowan

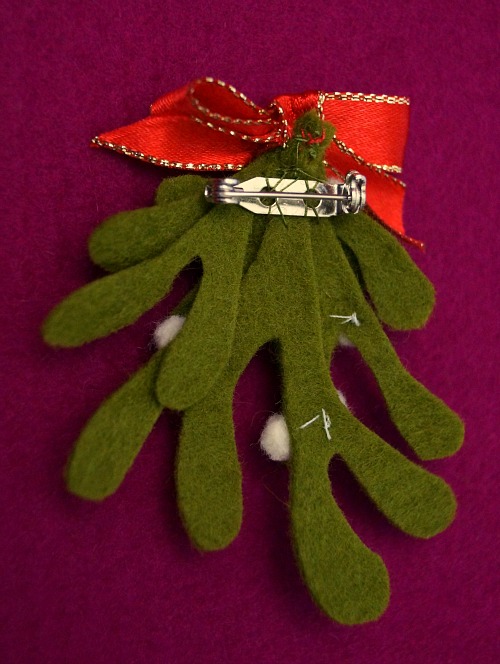
Turn your brooch over. Thread your needle again (I used green but it doesn't really matter for this part) and get your brooch clasp. Sew the clasp on to the upper central part of your felt.

Mistletoe Brooch or hat Pin Tutorial by Tanith Rowan

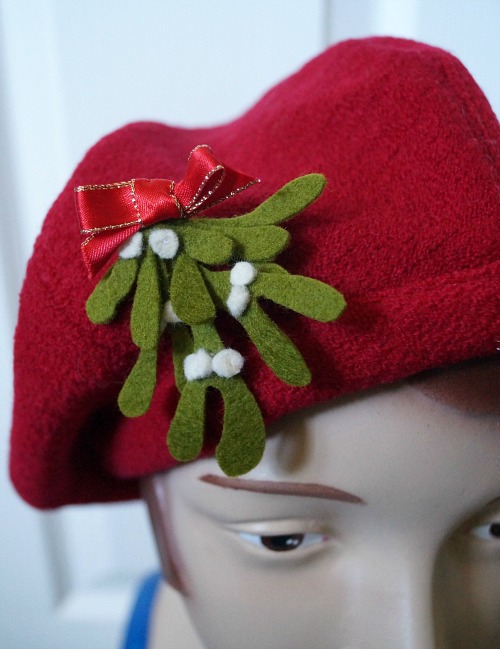
Clip your brooch on! Wear it as a brooch or trim a hat with it. Or a bag! Or...whatever!

Mistletoe Brooch or hat Pin Tutorial by Tanith Rowan

Suggested variations:

  • Use small white beads instead of felt for the berries
  • Add a tiny bell! I collect the ones from Lindt bunnies and so on, so I have them on hand for crafts
  • Use an alligator clip instead and pin straight into your hair
  • Make a cute felt bow instead using thin red felt
  • Change it up completely by cutting holly leaves instead and making red berries


I know that some people like Christmas preparations to wait until closer to the day itself, but I'm not one of them. There have been a lot of Christmas songs playing around here, and it honestly has put me in the best mood! (And it inspires my Christmas creating too)

I hope you enjoyed the tutorial. If you use it, I'd love to see what you make :)
SHARE:
Blogger Template Created by pipdig