Tuesday, 8 December 2015

"Squirrel and Oak" Whimsy Design for December

Back in August, when I made the Scottie Dog whimsy, I asked for suggestions of other animals that would be cute on the veil of a design. Kate-Em suggested squirrels, paired with acorns, and I just loved the idea. I had been contemplating acorns on a whimsy for a while, and squirrels were the perfect complement as well as being an animal I love.


There are just a few squirrels running around the bottom of the veil, and one sitting at the top near the cluster of leaves and acorns.


My acorns were inspired by some amazing ones my sister made in an embroidery class. I was going to show you a picture of this inspiration, except that it would look like one of those "Saw it on Pinterest. Nailed it." memes and my pride is too sensitive. Still, I think my method was likely quicker, and it was fun to make. Anything that involves blocking felt over beads has got to be good. It felt like I was making the world's tiniest hats.


 It has ended up very autumnal, which I like, even it is currently Autumn in zero places in the world.


My lovely friend Ruanne, who you have seen model for me many times in the past, came up to the mountains with her family for a picnic in the park combined with a modelling session. I'm sure I've said it before, but I have the best friends!


Now I've done something tricky with this whimsy, which I've been planning to do for a while, but I hadn't quite worked out how to make it work. While whimsies are fun and very glamorous, they aren't necessarily something for everyday. So I made this one a bit more versatile.


Ta-da! The top part is a clip that can be removed and worn separately, for when a veil is just too much. Or you aren't in the mood for squirrels? Is that possible?


We also shot some other pieces, including the Christmas mistletoe whimsy, which I had only briefly shown you along with the Mistletoe Brooch tutorial.


It matches so beautifully with this blouse, which Ruanne made herself (from the Sencha by Collette Patterns, I believe).


Working out what type of hat wearer she is. We decided on "The Sophisticated Young Married or Businesswoman".


All of which brings us to the conclusion of the Bring Back the Whimsy series!

Bumblebees, Whimsy Tutorial, Choc Chip, Autumn Leaves, Leopard Print is a Neutral, Strawberry Blossoms, Ladybugs, Scottie, Bridal Whimsy, Candy Corn, Mistletoe, Squirrel and Oak.

Looking at them all together makes me feel pretty pleased with myself! I had such a great time exploring fun novelty themes, trying out new trim ideas and techniques, getting reacquainted with fimo, cutting shapes out of felt, working out how to make bees, and playing with veiling. I'm looking forward to bringing some of these themes and techniques into future hats and hair accessories too.

Thank you all for joining me on my year of whimsies. I hope you had fun and maybe even made yourself a whimsy following the tutorial.

Do you have a favourite from the series? I would have a hard time picking one myself!
SHARE:

Wednesday, 2 December 2015

Wearing History's Costume Design Challenge - Part Two

Today I'm presenting part two of my illustrations for the Wearing History Costume Design Challenge. You can find part one here if you missed it. For the second half of the month, I put a more consistent effort into my sketches, although sometimes that meant getting behind and then catching up. Some costumes are (I feel) a more unusual take on the theme, with others they are more obvious and less creative. I had fun doing the sketches either way.

I found that for some eras I knew the fashions better and was able to play around with them more, while others I was in less familiar waters and my designs are more straightforward. I have decided I much prefer the sketches where I went to the effort of finding a photo with a more interesting pose to start from, rather than a straight-on view. And, as you can see, I took the time to colour most of them, and in general I like that much better too.

So here we go!

Romance on the Highlands


I was trying to think away from tartan on this one, but I also really wanted something I could imagine being worn out on the Scottish landscape. Once I could tear my brain away from older historical styles, I could see a hippie look with long flowing skirt and hair among the heather. I based my outfit on a long velvet skirt I have (and photographed with some floral headbands last year) but centred the design on Scottish flowers. Thistle was obvious, but I relied on the internet to give me some other suggestions. You can't really see them anyway, but there are Scottish bluebells and the hat features rowan leaves and berries.

On the Job


For some reason I thought of a young fashion designer in London in the 1960s, working with some friends in the little boutique they own and make the clothes for from their own designs. From there I naturally thought of my friend Nicole of Manic Pop (who I collaborated with last year and who made me a maternity dress). While she isn't pursuing fashion design currently, she has a distinctive style, and it was actually hard at first to try to work in her aesthetic without taking too much inspiration from her work. But she loves rainbows, and I love Yves-Saint-Laurent-style bubble hats and we both love the theme I chose for the dress. Bonus points if you can pick that!

Monaco Road Trip


I have tried to incorporate hats as much as possible in my sketches, and they have often driven the whole design. In this case, my first thought was of a scarf tied around the head, as is traditional for an open top car ride, I believe. From there I thought of where I could take that idea, and then (as I said on instagram) I was watching a Muppet Family Christmas, and then this happened. If you've seen it recently you may know, but maybe not. Anyway apparently Monaco doesn't get very cold, but there are cool winter days and it must get pretty breezy in those cars.

Music Hall Sweetheart


I've done some interesting research for this challenge. Music Hall was one I didn't know much about, and my internet wanderings led me to some male impersonators and so I went with that. This was a bit of a quick late night sketch!

Wild West Show


I thought of Jane Russell in The French Line. At the beginning of the movie she is in a practical western outfit of checked shirt and jeans, and later in the movie she does a dance number in a ridiculous sequinned number. I decided to go somewhere in between, with a shorter, sexier, dancier version of the first outfit, without getting all blinged up.

Venice Carnevale


My entire motivation here was to sketch one of the wonderfully outrageous medieval horned headdresses. Then my gold pen leaked over it. That's all there is to say really.

Vintage Reminisces of the Past

The 1920s loved their Egyptian revival, and that went from high fashion all the way to the elegant nude/semi-nude costumes. They are really so classy, in their own way. And a good excuse to really go all out on the head wear.

Her Dressing Gown


I wanted to go for something wintery, with a lush faux fur collar and a ridiculous turban, so that's what I did. I could handle lounging around in this during the cooler months.

A Transatlantic Voyage


This outfit was inspired by this image of a stunning coat from the 1920s, with an entire cruise ship pictured on the back. To change it up, I translated the ship image to the cloche hat, and kept just the waves on the lush velvet wrap coat.

At the Garden Party


Again my first thoughts were probably floaty chiffon 1930s dresses or all-white Edwardian numbers, so I kept on moving, and settled on some big bold sixties florals again. And the all-over floral hat options that go with it.

The Circus


I'm quite a Marx Brothers fan, but I had never seen "At The Circus" (although I have it on DVD, courtesy of my father-in-law). So I started to watch for inspiration, and it didn't need more than 5 minutes to find an inspirational and lust-worthy outfit, from which starting point I created this.

The Jane Austen Adaptation


Totally motivated by my fascination with this lamp-shade of a hat style. I picture it being worn by Caroline Bingley.

In Palm Springs


Another one that led me to the internet to find out more about Palm Springs. Their tourism website made it clear that Palm Springs is full of young people in bright bold prints. And I love bees. So there you have it.

The Poet


I felt I needed a character for this one. A real story. The first poet I thought of (perhaps oddly) was Augustus Fawnhope, a character from Georgette Heyer's "The Grand Sophy." He's a beautiful young man completely absorbed in his art and dreamily unaware of most that goes on around him. Since I hadn't done any male costumes, I thought that would be fun.

Fairy Tale Ending


I had a few ideas for this, but I couldn't get away from drawing a version of my own fairytale ending. There are of course many facets to that, this was an obvious choice. One day!

This was an epic challenge, that exhausted but also inspired me. It was the first daily Instagram challenge I've participated in, and I enjoyed it, but I would think very carefully before embarking on another one! Maybe a one-week challenge would be better. It would be fun to see some more happening in the vintage community.

Over to you! Any of these outfits take your fancy? And is there any kind of Instagram community challenge you wish existed for you to take part in?
SHARE:

Tuesday, 24 November 2015

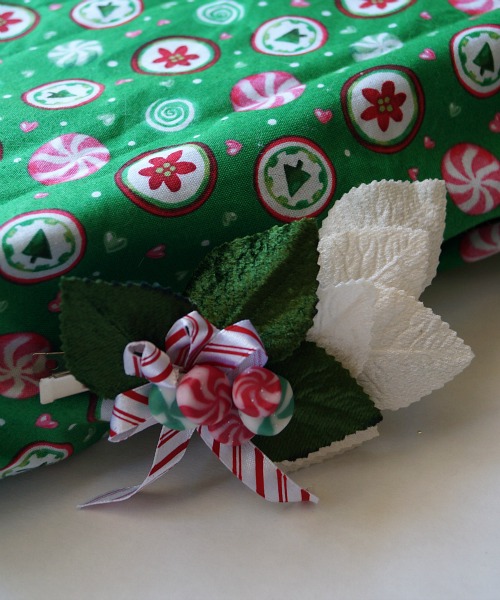
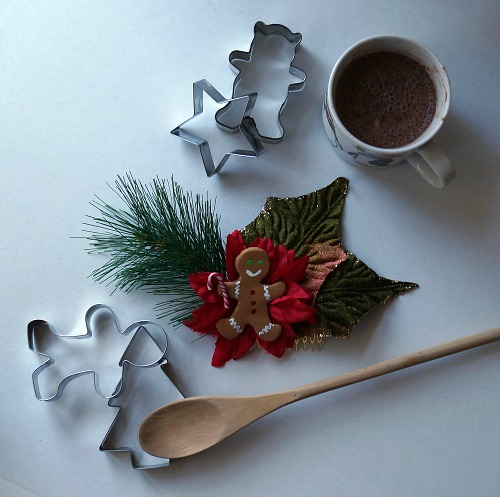
Christmas hats, hair flowers, clips and combs

I haven't shared a lot in the way of small hair clips or flowers on the blog, and to be honest they are not exactly my main priority. But they are fun and I wear them occasionally myself, and make some for my bricks-and-mortar shops and markets (ok, market, singular).

This year I really wanted to make some Christmas items, and although I had a lot of grand ideas that will perhaps one day come to fruition, it was more realistic to make some smaller items. I had a lot of fun with these.


Since Christmas is approaching at a rapid pace, I wanted to get these done and into the shops by mid November. This rush meant, however, that I didn't yet have a model lined up, so for the first time I did a no-model photoshoot. As well as Edie and my other trusty mannequins, I relied on themed props.

www.etsy.com/au/listing/257560642/christmas-gingerbread-man-hair-flower

It was heaps of fun! And I found a LOT of Christmas crap without having to actually get any boxes out of the shed. I'm a little surprised, but I shouldn't be. And also I'm a little proud.

www.etsy.com/au/listing/257459423/peppermint-swirl-christmas-candy-hair

Product photography advice seems generally to be geared towards smaller items. People are always telling you to build your own little light box and set up white background and use a bit of a table and props and I always think "Do you realise how big a hat with a pheasant feather is?" Nevertheless, the information was sitting around in my brain and I finally got to use it!

www.etsy.com/au/listing/257562066/mistletoe-a-christmas-vintage-style

Although don't you hate it when you look at the photos afterwards and realise something wasn't sitting flat and it's that way in EVERY photo?


I still have a long way to go with photography and so much to learn, but I enjoy it immensely and love it when a photo turns out just right. I'd love to get from "not bad" to "actually quite good" one day.

www.etsy.com/au/listing/257564462/winter-themed-miniature-top-hat-in-grey

This is actually an older piece, from my "make all the miniature top hats" phase, but I still really like it and thought that Christmas was a good time to list it!

www.etsy.com/au/listing/257560642/christmas-gingerbread-man-hair-flower

I'm still hoping to squeeze in a modelling session but until then, these will have to do. For the ones that are listed on Etsy, the photos link to the listing. The others will probably be going into bricks-and-mortar shops soon.
SHARE:

Tuesday, 17 November 2015

Wearing History's Costume Design Challenge - Part One

This month I'm participating in Wearing History's Costume Design Challenge. Each day in November has a theme set by Lauren, and everyone sketches their interpretation in costume form and posts it to instagram. I'll admit I haven't been keeping every deadline, and that's even taking into account that I'm working on the US time zone, but I have mostly caught up now. The challenge is just over halfway through so I wanted to share my designs with you here on the blog too.

I apologise for the picture quality. Most were taken on my phone, and although you might think I could scan them in now for better images, that would imply that they don't have shopping lists and to-do lists all around them by now.

Femme Fatale 


I tried to move beyond the first ideas that came into my head and come up with something more unusual and hopefully interesting for each theme. My femme fatale became literally deadly as a skilled fencer. I love some of the crazy fencing outfits women wear in some vintage photos, so I took some inspiration from those and a bit of musketeer flair and went from there.

Gothic Thriller


I had a few ideas here, including a crazy headdress designed to look like a Gothic castle (perhaps someday...) and then I thought about the Landmark Trust's Gothic Temple and how I considered staying there on my last UK trip (again, perhaps someday - despite the steep stairs to the bathroom). So my Gothic nightgown and cap incorporates some of the architectural features of that gorgeous building.

She Travels By Train


I was recently reading some of my grandmother-in-laws record of her memories from Hungary during the war. Amongst these were some train trips using borrowed identity documents. I've pictured my girl as younger, and with a borrowed overcoat as well as borrowed papers.

On the Farm


One of my quicker sketches, and not the most inspired. I struggled to think out of the box for this one, so I just focused on the hat. I have some artificial wheat sheaves in my millinery stash, so I imagined a straw hat using those, with sunflowers, sweet peas and lavender, and gingham brim binding.

At the Ascot Races


Given this challenge fell around Melbourne Cup time, I went modern. I don't really do racing millinery, but I love the amazing creativity and artistry of those who do. As a starting point, I took my inspiration from a vintage Australian racing fashion image.

The Opera Singer


Since the opera followed the races, my thoughts turned to the Marx Brothers. Naturally. So I thought about the wonderful farewell song between the boat and the shore, and spun that story out. My opera singer is farewelling her love as she leaves for her new and brilliant career. Her dress and hat are decorated with forget-me-knots.

Revolution


It almost isn't worth showing you this one but in the interest of completion, here it is. Plus I quite like these hats. My sister suggested the "ethical fashion revolution" when pressed for an idea, but I didn't know what to sketch for that. Then I thought about the materials I wish were available to me as a milliner - ethical options for faux fur, silk and feathers, and ethical wool felt that still blocks as smoothly as fur. A girl can dream.

The Factory Worker


Rhiannon also suggested Steampunk, which I used for the Factory Worker challenge. I combined the excessive patterns and trims of the Victorian era with a big draped apron full of pockets and tools, and a jaunty wind-powered light hat with dragon wings.

A Royal Wedding


This isn't really a new design, but a sketch of my great-grandmother's bridesmaids dress from the 1920s. The bride's dress was a similar style, and I find it one of the more interesting and unusual dress designs so I wanted to highlight it. I added some oak and roses and fleur-de-lys as things I (and the helpful internet) defined as feeling rather "royal".

The Chorus Girl


The day before this challenge I went to the zoo, and wanted to use that as inspiration. I love the golden pheasants, so I combined their colours and patterns with some design elements from this family photo of Mabel (some kind of great aunt?) performing at Drury Lane.

Adventure!


So the story here is that when I was pregnant, we spent a lot of time discussing names. Sometimes a name would suggest a particular personality or future occupation that we would joke about. Most significant of these was "Kit Kovari: Girl Detective." And here she is.

Tea Dance at the Palm Court


I didn't know what that meant at first, but Lauren explained that the grand old hotels would have afternoon tea dances. Now I don't know much about dancing but I do know my afternoon tea. I'm a bit of a high tea connoisseur, in fact. So my design is a modern vintage-style novelty dress with a three-tiered dessert skirt, and a tea-themed whimsy on top. If you can't see the detail, that's sandwiches on the bottom, scones in the middle, and miscellaneous desserts (mostly small fruit tarts) on the top. Yum!

The Collector


My collector is a bird watcher, collecting the names of birds in her book, ticking each one off a great long list of birds. With giant bird buttons and bird fabric on the cuffs of her trousers.

Understructure


I struggled to think what design elements I could really add to underwear. I could sketch it, but I didn't feel I could really design it. So I wanted to come up with an actual costume, something arty from a ballet or opera or who-knows-what (you certainly can't dance in this, or even walk really) with underwear as its basis. Then during an early-morning feed I was thinking about moths, and this came to me. So there it is.

Before this challenge, I'd actually been sketching a little each day, over a toddler-paced breakfast, to work on my drawing skills, particularly at drawing people and faces. So the challenge fit right in with my goals, and although it is taking more time than those quick morning sessions, I feel like it is a great exercise in creativity and in developing my artistic style and skills again. I've experimented with faces, no faces, drawing on croquis or freehand, pencil sketches and coloured images, different papers and all sorts of things! I'm really enjoying it.

I'll be back after November ends with Part Two!
SHARE:

Friday, 13 November 2015

The Sisterhood of the Travelling Hat - Jessica

Adelaide has been visiting Chicago, and fabulous fashion blogger Jessica of Zella Maybe.


It can be hard when styling something that has been seen multiple times before, and find a way to put your unique spin on it. Jessica decided on some literal spin and turned the hat around. I would never have thought of that, and now you get to see all the detail at the back, and the figure-eight bandeau sits across the front. Adelaide turns out to be an even more versatile hat than I ever imagined.


Jump over to Jessica's blog to see the rest of the photos and leave her a comment! And I'd also love to know what you think, and whether you've ever tried wearing a hat a different way to change it up?
SHARE:

Wednesday, 11 November 2015

Christmas Felt Mistletoe Brooch (or Hat Pin) Tutorial

When making my mistletoe whimsy, I was really enjoying playing with felt mistletoe, so I decided to also make a brooch version that could also be worn as seasonal trim on a hat.
Mistletoe Brooch or hat Pin Tutorial by Tanith Rowan

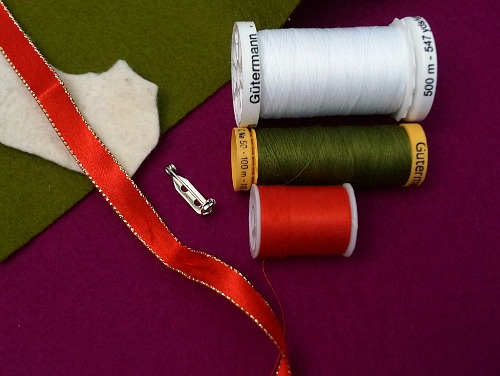
So let's get into it. You will need:

  • Green felt, approx. 10m by 10cm, can be in smaller scraps (I used 100% wool, 1mm thick)
  • White felt, a small scrap of a few square cm (I used some hand-felted wool from a friend, about 1-2mm thick but varied)
  • Red ribbon, approx. 15cm long (mine is gold-edged, 1cm wide, some kind of cheap craft ribbon from my stash)
  • Matching threads
  • Needle
  • Brooch clasp
  • Sharp scissors

Skills required

  • Hand stitching. You don't need any particular "stitch", you are just going back and forth through the materials to hold them in place, but you need to be able to thread a needle and tie a knot in the end and so on. (Having said all that, you can just use glue if you like!
  • Um...that's it!
Mistletoe Brooch or hat Pin Tutorial by Tanith Rowan

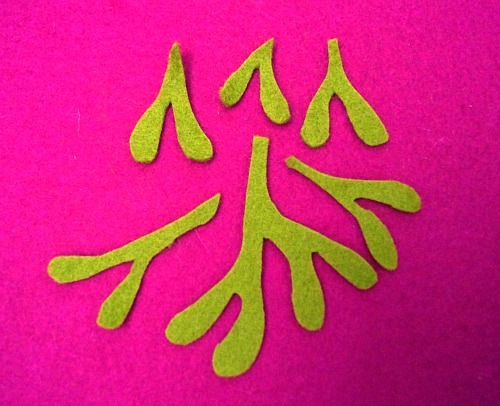
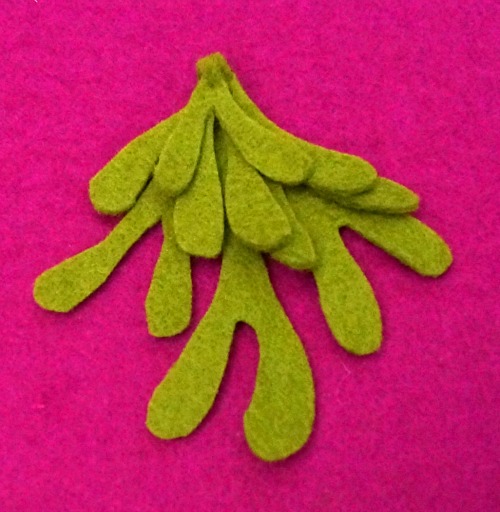
(Let me explain right here about my background colour. I wanted a solid background but not white, so that the white felt would show up. I used this fuchsia pink felt, but its colour showed up totally differently in different photos! Oops!)

Cut out your mistletoe leaves. Here is a picture of mine. I cut freehand based on looking up images of mistletoe. I had to make sure I searched for real mistletoe, since a lot of results were clip art and illustrations, and a lot were also actually holly!

Mistletoe Brooch or hat Pin Tutorial by Tanith Rowan

But if you aren't confident at that, fear not! I turned mine into a pattern for you. Literally. I turned that image into a pattern rather than drawing one. I'm not sure if that's lazy or efficient. Print this out at approximately one quarter of an A4 page. Cut each shape out. I recommend tracing around with an erasable pen as the easiest way, then cutting out. This also allows you to get an efficient layout on your felt.

Mistletoe Brooch or hat Pin Tutorial by Tanith Rowan

Thread your needle with green thread and knot the end.

That big piece is your base. Layer the others on top and sew them on, using a couple of stitches through the top of each one. Add the bigger pieces first, then the smaller ones on top.

Mistletoe Brooch or hat Pin Tutorial by Tanith Rowan

Cut out 8 small circles from the white felt. If they don't look round enough, rub them around between your fingers a bit as well. Place them on your mistletoe in pairs, with each pair located at the top of a pair of leaves. Thread your needle with white thread and knot the end.

Mistletoe Brooch or hat Pin Tutorial by Tanith Rowan

Stitch the berries on using the white thread and a stitch or two per berry. Start and finish the thread again for each pair so you don't have a long stitch between them at the back.

Take your ribbon and cut into a longer and shorter length (about 10cm and 5cm). Cut the longer piece on an angle at each end. Thread your needle with red thread and knot the end.

Mistletoe Brooch or hat Pin Tutorial by Tanith Rowan

Fold the longer piece into two loops and two ends, the loops and ends of the bow.


Stitch these folds in place with a few stitches.

Take the shorter piece and wrap it around the centre of your bow, and stitch that in place at the back of the bow.

Stitch the bow to the top of your bunch of mistletoe.

Mistletoe Brooch or hat Pin Tutorial by Tanith Rowan

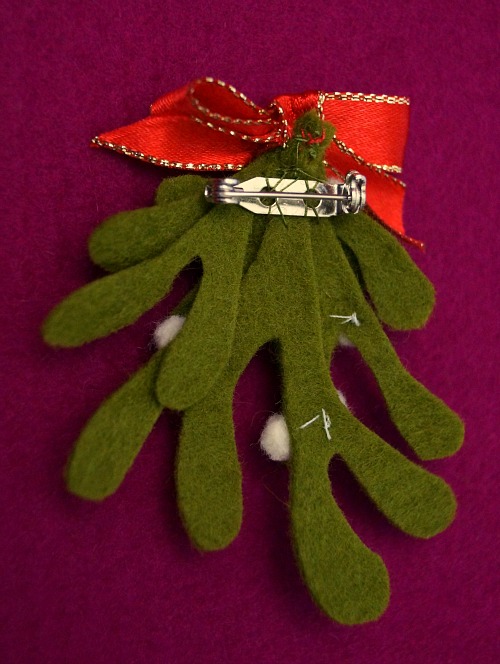
Turn your brooch over. Thread your needle again (I used green but it doesn't really matter for this part) and get your brooch clasp. Sew the clasp on to the upper central part of your felt.

Mistletoe Brooch or hat Pin Tutorial by Tanith Rowan

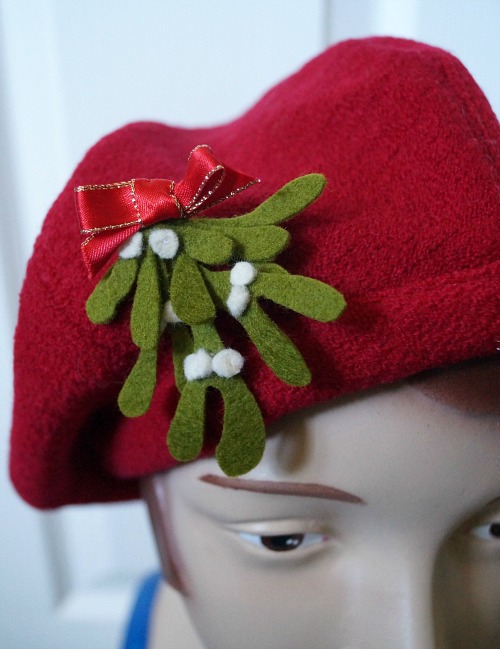
Clip your brooch on! Wear it as a brooch or trim a hat with it. Or a bag! Or...whatever!

Mistletoe Brooch or hat Pin Tutorial by Tanith Rowan

Suggested variations:

  • Use small white beads instead of felt for the berries
  • Add a tiny bell! I collect the ones from Lindt bunnies and so on, so I have them on hand for crafts
  • Use an alligator clip instead and pin straight into your hair
  • Make a cute felt bow instead using thin red felt
  • Change it up completely by cutting holly leaves instead and making red berries


I know that some people like Christmas preparations to wait until closer to the day itself, but I'm not one of them. There have been a lot of Christmas songs playing around here, and it honestly has put me in the best mood! (And it inspires my Christmas creating too)

I hope you enjoyed the tutorial. If you use it, I'd love to see what you make :)
SHARE:
Blogger Template Created by pipdig